Friday 27 June 2014

Back to school, a second swarm.

Last Friday I got a call from the swarm coordinator at Beverley Beekeepers Association about a honeybee swarm on Ella Street, about a quarter mile from where I live, unfortunately I was working so missed it. Turned out they would've been a bit hard to reach being six metres up a tree anyway. Then on Saturday I got another call about another swarm, this time on Greenwood Avenue. But I was out at Yorkshire Sculpture Park looking at some pretty amazing woodwork by Ursula von Rydingsvard, so once again I was unable to go look. Then on Wednesday I got a call about another bee swarm at a local school which I was free to go collect. That's three calls about bee swarms in Hull over six days, the coordinator had also been dealing with swarms in other areas too.

Rydingsvard's handiwork at YSP
The swarm were on a tree at Winifred Holtby Academy, a modern school over on the east side of the city. It's a rather nice campus, attractive outside and in. I don't know why Hull doesn't make more of it but we have some really impressive modern architecture in the city -there's certainly more than The Deep over here. Anyway after a couple of phone calls I dug out a 6 frame nucleus I'd built last August (and forgot to blog about) along with two frames of drawn comb and four of foundation. I grabbed the usual tools, smoker, metal bucket, gloves, boots and smock and my trusty Teflon coated saw -it's a bit old but not too long in the tooth. Saw, tooth. See what I did there?

Following the instructions of my satnav I arrived at the school and spotted (well okay couldn't miss) an area of immaculate lawn with a number of saplings on it that'd been cordoned off with cones and red and tape. There was a dark mass near the top of the middlemost tree which I guessed had to be the bees. I wandered into the school spoke to a couple girls on reception, one asked what I was going to do with the bees. I told her I was going to pop them in a box, take them home and keep them in my garden, at first she thought I was joking. :)

I'd guess the tree was about 5 metres tall, possibly the tallest of the set but not by much. One of the caretakers helpfully lent me some steps which I put near the tree so I was able to reach the bottom of the cluster. It was actually a very big cluster I suspect if I'd brought a 5 frame nuc it would've been a tight fit and with the 6 frame nuc they'll be a little congested. When the swarm was flying it must've been quite a sight.

It's one big cluster..
I needed to cut the branch to remove the bees but didn't want to take off any unnecessary tree and even on the ladder I could just reach the bees. If I was to just cut the branch below them the cluster would fall onto me or to the ground and I'd have to wait for the cluster to reform -neither were winning scenarios, especially with a little audience.. But with a plan in mind cut through the wood I did. It was bit slow going as I didn't want to shake off too many bees whilst sawing. Some bees fell from the cluster and I was able to gather them onto a frame of empty comb and place them in the Nuc. I figured they'ed probably start nosanoving and attract any fliers.

I cut almost but not quite through the branch so it hung downwards from the uncut edge. Holding the bit with the bees on in one hand I used a sharp coping saw, also loaned by the caretaker, to cut through the rest and carried the branch and the bees down. At this point some bees took flight, regrouping on other branches, but the majority stayed in the together. The important bit was to not lose the queen who should be somewhere in the middle of the mass. Holding the bee covered branch above the nucleus I gave it a sharp jolt downwards causing the bees to fall to the Nuc floor, filling it a couple of inches deep. At this point they got pretty noisy but there wasn't any mass exodus from the open box. None of the videos I've seen of people catching swarms manage to do the noise justice, it's something you
really need to experience first hand.

Circle
I picked up the rest of the frames and dropped them in place not pressing them down as they were sitting on a cushion of bees. It didn't take long for the bees to move between the frames or out of the entrance allowing them to be settled into position and the crownboard placed above. The crownboard had a round feeding hole in the middle and the  bees nosanoving on top of it with their heads to the hole formed a circular pattern around it.


Budge up!
At the front of the hive there was a large number of bees who I guess had come out of the entrance shortly after being shaken in as well as flying bees who'd landed there. There was plenty of nosanoving going on there too which was just as well because a cadre of bees had returned to form their own small cluster up in the tree. To move them out I used a combination of smoking, brushing and gave the tree top a few good shakes to dislodge them, repeating the process a few times as they returned in smaller numbers. I used the same process to get bees off the steps too and gave the tree top a thorough smoking to mask any pheromones left on the wood. If this had been in a garden I'd've headed off at this point and returned few hours later when the bees were all inside but being a school building with people coming and going for various sporting activities that wasn't really a good plan so I spent a couple of hours with a rather nice coffee talking to the also rather pleasant girls on the reception before finally blocking the entrance with some sponge, taping it secure and making the slow drive home.

Spot the new one...
There was no room on the hivestand for this colony so I knocked up a temporary stand using left over breeze blocks and placed the Nuc on that. Whilst I have the space for a few more colonies I don't think it's very practical to have more than three given my urban location so at some point I'll be uniting a few colonies to get myself back down to three.

Mystical Stone of Orientation
I gather swarmed bees should automatically reorient themselves with their new surroundings after being hived but didn't want to take any chances -and it's not like bees haven't been known to do the exact opposite to what's expected. So I placed a small stone outside the hive entrance, not blocking it but certainly noticeable to the bees as they came out. This is a trick I picked up from the forums and should make them take note of the location of their hive entrance and prevent them trying to return to their old site.


The next day there were noticeably more bees flying in the garden particularly near the 6 frame nuc. I guess the new bees were taking orientation flights. Being a swarm they're probably all mature bees anyway unlike a regular colony where only about ten percent of the bees are going to be flying, plus in an established colony the flying bees will be going away to forage and returning straight to the hive rather than milling about outside so you'd probably see fewer at any one time anyway.

This weekend I'll hopefully have a look in the hive, see if the Queen is marked or not. I've got no idea where they came from but going by the size of the swarm they must be from a pretty healthy colony. Going to have to make some decisions about which Queens to keep when I start uniting colonies very soon.

Thursday 26 June 2014

More Boxes..

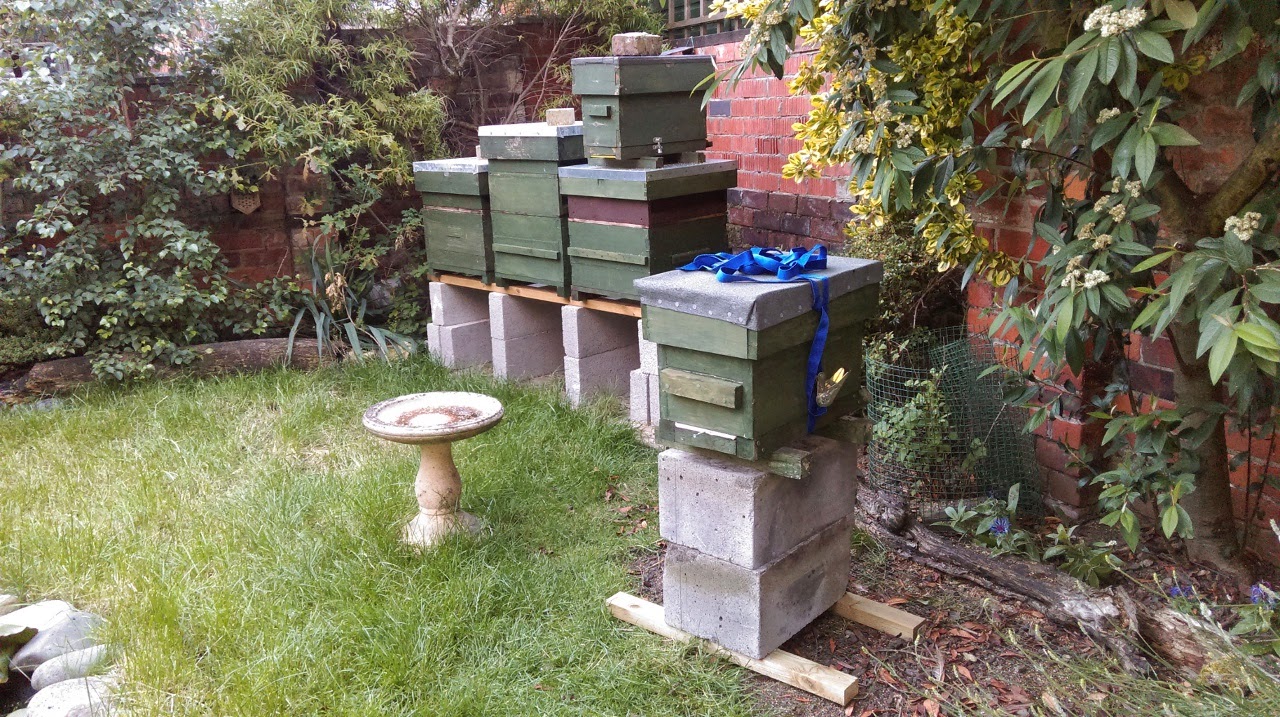
To manage swarming beekeepers need to have enough brood boxes for twice as many hives as they have. After starting with two brood boxes picked up on eBay I later made two more giving me enough for both colonies. I later moved the swarm I'd collected in July last year into one of the brood boxes giving me three full size colonies, meaning I now needed 6 brood boxes. A commercial brood box costs £40-£50 apiece and I didn't have quite that  much change down the side of the sofa so I decided to make my own again.

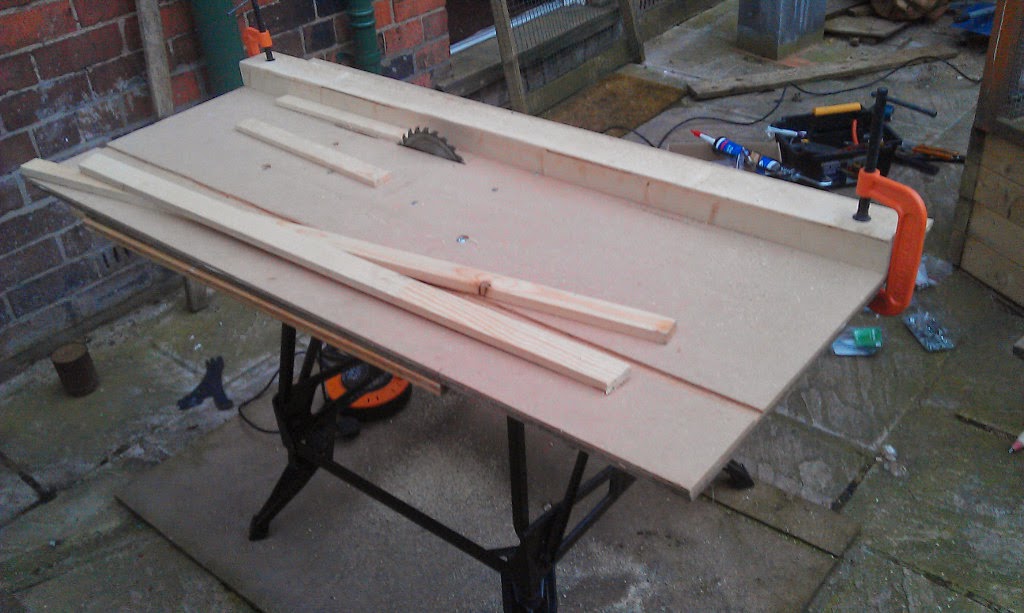
It was a lot of hard work last time using a couple of handsaws, a plane and a hive stand stabilised with breeze blocks as a work surface. This time I figured with a workbench available things should be a lot easier. A table saw would probably help too but they're a bit pricey. I recently got a couple of Argos vouchers for making a load of money suggestions at work - things like print on both sides of the paper, yeah, not exactly rocket science is it. There wasn't enough for a table saw but there was enough to cover the cheapest circular saw in the shop and a bit of hardware. So armed with a Challenge 160mm Circular Saw, some screws, a couple of clamps and some wood I made a saw top to go on the workbench.

Contains small parts, young children may require some supervision.

It's a pretty easy thing to make really, and there's plenty of articles on the Internet telling you how to turn a perfectly safe circular saw into a far from safe tablesaw if you feel the urge. I made mine so that the cut depth can be altered by turning a couple of screws. The gate is just a straight piece of wood held in place by G-clamps. Underneath is some bracing to hold the saw in place, stop the tabletop from warping and to secure it within the workbench. The top itself is a piece of MDF glued to some hardboard that spend a year under the chickens. Using the saw I routed channels for a crosscut sledge but I've not got around to making that yet. One thing to remember with this is when positioning the gate it needs to be done relative to the blade rather than the table edge just in case the blade is a couple of degrees out. At the moment it has the on switch cable tied in place so when it's plugged in it keeps going. At some point I may add a foot operated deadman's switch in a nod towards safety. BTW if this inspires you to make one and you lose a finger or five I take no responsibility -just because some random posts something on the internet doesn't mean you should follow.

Looks a bit Flintstones
As before making the sides of the brood box required joining two pieces of wood together. Previously I'd used a plane to cut the rebates where the pieces would overlap to give me sides the right height but with the new toy it was just a matter of making two cuts on each piece. If you're trying this at home remember to use push sticks - you don't want your fingers near that spinning blade. I'd originally attached a splitter to the table top, that's a piece of metal that goes behind the blade to stop cut wood trying to close around the blade. It didn't work though so I removed it. This meant that the wooden offcuts were occasionally caught by the blade and hurled across the garden. Unexpected and impressive, but a little inconvenient.

I made one brood box using wood from my local B&Q and the other using wood from my local woodshop. Pros and cons are at B&Q when the label says 22mm it means 22mm but it costs more and the wood and is warped whereas the independent woodshop uses those 'nominal' measurements were 25mm means 22mm but the wood is flat and cheaper. So obviously it's worth grabbing a tape measure and trying a smaller supplier.

It's Hip to be Square.
I picked up enough wood and tanalised screws to make one broodbox for just under £12 from the woodshop. The rebate for the frame lugs I made using the plane -I could've done them faster with the saw but truth is I forgot about them till after I'd lugged the saw back inside and I didn't feel like hauling it out again.

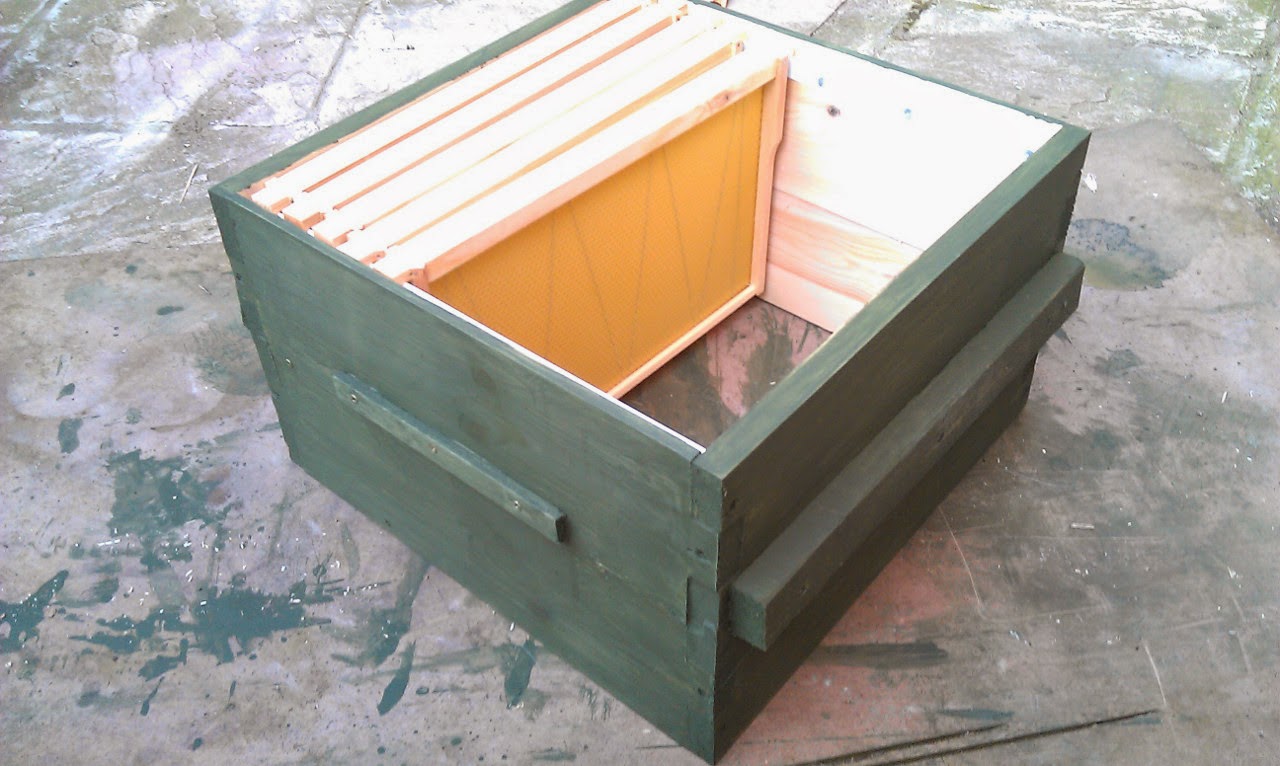
Commercial frames are meant to have rebated had holds on two sides. This means they can be stacked together which is useful for commercial operations who need to move large numbers of hives about on flatbeds. I'm unlikely to ever need that facility so I just attach my handholds on the outside of the boxes, I also add a couple of smaller handholds to the other two sides to making the boxes easier to manoeuvre. They need to bear a lot of weight so need to be attached very securely.

Think I'm getting better at those corner jointy bits.
Then it was just a case of knocking together some deep commercial frames and the boxes were good to go.

Tuesday 10 June 2014

The Stand Revisisted

Well this year I seem to be have been having a bit of a problem with chalkbrood - well not so much myself as the bees really. I've been swapping out hive floors to remove dead brood, treating the bees and comb with Beevital Mycostop and worker numbers have been rising so they appear to be on top of it now but I'm still seeing a couple of infected brood in hives 2 and 3. Having done some reading up on the topic current thinking suggests it's related to poor ventilation in the hives. All three hives have mesh floors but they're standing on wood supported by large breezeblocks, and in the case of Hive3 they're directly on the blocks. I'd put those blocks in place last summer and I'm starting to suspect that perhaps they're restricting ventilation too much and also they may be keeping detritus falling through the mesh too close to the hives.


Heavy blocks, possibly reducing ventilation under the hives.

So after work on Friday I made a trip to B&Q to get a new hive stand. There's a few different ways to make a hive stand. Some people use a wooden pallet on the ground, some use purpose built wooden platforms, but I favour breezeblocks. In nature honey bees don't nest close to the ground, current stands are generally designed with the beekeeper being able to access the hive in mind. Making a wooden stand would have let me position the hives at the exact height I chose I decided it's take a like too long to do as I was wanting to improve ventilation asap so I went with blocks again. Smaller ones though.

Well that was an exciting shopping trip.
Mine were originally one block from the ground and I put in the wider blocks when I decided to raise the hives a little to make them easier to work. Wider blocks seemed a good idea at the time to make the stand more stable. I'd also only had 2 hives and a nucleus whereas I've currently got 3 hives so I wanted to alter it at some point to support all three on the same platform. There's some wisdom to having each hive on a seperate stands, so vibrations from inspecting one hive don't affect the others, but given the location of my hives this wasn't really feasible.

The supporting structure was designed by a chicken.
Wanting to maximise airflow but also create a stable platform I decided to arrange the hives so there was supporting blocks for each side of each hive. For three hives that meant four columns of blocks. A vertical stack of breezeblocks would probably fall over in a light breeze so I put some treated wood between the blocks and the hives, my theory was that the weight of the hives spread across and pressing down on the blocks would keep things stable as well as increasing ventilation. I'd dipped the cut ends of the wood in end grain preserver to give them a slightly longer life.

The grass needs a mow. Feel free if your passing.
Waiting till the temperature dropped below 10 degrees Celsius and the bees weren't flying, but it was still light enough to see I donned a weightlifting belt, a bee smock, wellies and gloves. First order of the day was to get the hives off the stand. They were heavy. Removing the roofs I used correx sheets over the crownboard feed holes and moved the hives out of the way. Hive3 was just a brood box so that wasn't a problem, Hive2 had a super on it but I managed to move the floor, brood box and super without having to separate them -I was hoping to caused minimum disruption to the bees. Hive1 still had a second brood box from the artificial swarm on top as well as a super. There was no way I was going to move that lot in one go. I moved the Demaree onto the crownboard above Hive2, slapped another crownboard on that then did the same with the super. I put another crownboard on top of the Queen Excluder on the bottom brood box and moved that away too. To reduce my chances of getting stung and possibly dropping a breezeblock on my foot I'd turned the moved hives so the entrances pointed away from me. Well nobody really likes being watched whilst they work.

Done!

When I'd put the blocks in last year I'd had a glamorous assistant to help and there were no supers and one of the hives was actually an empty nuc, but this time with more to move it was to be a solo endeavour. It took about half an hour from start to finish. I used three crownboards to get the spacing right between the columns -you can never have enough crownboards. The finished stand seems pretty stable and as well as allowing more ventilation I can clear away anything building up under the hives easily and look under the hives with my mirror-on-a-stick.

I could make a fort with those!
The old blocks are now sat waiting for a friend with a van to come pick them up so she can use them in her vegetable garden. I'm sure I was an inch shorter after all that lifting. Hopefully this will be the final time I have to remake the hive stand.

Monday 9 June 2014

Macro Photography

For the past few years regular readers have been enduring my camera phone photography, it's a little tricky operating a touchscreen when you're wearing Dexter style black marigolds and I'm often trying to hold whatever the subject is in one hand or trying to follow something on the move. So it's fair to say the pictures could be better.

In March I had a visit from the young lady who runs Facet Photography. As well as doing photoshoots she also does nature macro photography and has a page dedicated to this over at Facet Photography Artworks with images for sale online. With a keen eye for an image, a digital SLR and macro lens taking her close to her subjects she manages some impressive images.

Worker Bee covered with Pollen
In the picture above we see a worker of the side of a hive roof sunning herself after a busy morning of gathering pollen. She's very fluffy still so I'd guess she's not been foraging for long. If you click on the picture below of a worker bee on the comb you can clearly see two of the bee's three simple eyes (or ocelli) on the her head between her large compound eyes.


Worker Bee on open Comb cells


Tuesday 3 June 2014

New Queen?

This week the Tree Bumble Bee in Hive1 wasn't the only unexpected Queen I found. Looking in Hive2 which is currently being affected by chalkbrood I couldn't see the red marked queen at all. What I did find was an unmarked queen near the middle of the hive. Whilst it's not impossible for the red paint to have come off there wasn't even a trace of the stuff on her.

A new Queen?

My conclusion is that the bees have managed to sneak a new queen past me and superceded the red marked queen. If the hive has issued a swarm it must've been a very small one as there wasn't noticeably any less bees than previously.

Capturing her in a clip I moved her into the marking tube, mixed up some green acrylic paint and popped a dot on her back then returned her back in the hive. Workers quickly clustered around her and I really hope they didn't mistake her for a stranger and decide to kill her -it can happen.. If she is a new Queen then she must be very young and so may not have even mated yet so I left her wings unclipped in case she still needs to make a mating flight.

Sporting a bit of green paint

Monday 2 June 2014

Unwelcome Visitors

Last week whilst inspecting Hive2 I got to the final frame and noticed some cobweb in one corner. I assumed this meant wax moth larvae. Not the best thing to find in a hive but it can happen from time to time.

It wasn't wax moth. Turning the frame round to examine the far side I loosed a loud expletive as I was unpleasantly surprised to find a huge spider a few inches from my hand. It wasn't one of those inoffensive raisins on skinny leg type spiders we see so much of, this was a fat legged, silvery grey refugee from Middlearth. Luckily she was busy with a worker bee. Her web making skills weren't up to much but there was another cocooned bee and an egg sac in there too. I'm certainly not arachnophobic but it's fair to say I'm not hugely keen on finding large unexpected spiders near to my fingers -the latex gloves I was wearing suddenly felt far too thin.

Initially I decided to try and take a photograph but quickly changed my mind. Like I said she was pretty big and I thought she might nick my camera. I also didn't want her to run onto me or to escape near the hives to spend the rest of the year chewing on my workers. Holding the frame at arms length I rushed over to the patio and with one welly booted foot kicked her off and stamped on her. To any onlookers I imagine it was just like that bit in The Lord of the Rings where Samwise Gamgee defeated Shelob.With a hivetool I removed the mess of webbing and as I didn't want a tribe of spiderlings feasting on my bees I lit the blowtorch and took take care of the egg sac.

After a lot of Googling I think what I'd found was a particularly large female Mouse Spider. They're called Mouse Spiders because their grey velvety fur looks a little like that of a mouse, well a little like a mouse if you overlook the fact it's got no tail, 8 legs, 8 eyes, fangs, mandibles and makes webs. They're one of the few venomous spiders in the UK that can bite humans and as English arachnids go I gather they're rather aggressive. Hope not to encounter any more of them this year.

With that unpleasant little experience in the past I found another visitor to the hives this week. Inspecting Hive1 I'd removed the Demaree and the Super and had just moved two frames onto a perch to give me room to work in the hive when a black hairy shape poked up between the dummy board and the hive wall. I stopped work to see what happened next and up popped a very large bumble bee being harried by a few workers. Going by the colouring and the size I'm pretty sure it was a Tree Bumble Bee (Bombus Hypnorum) Queen.

Whilst the Bumble Bee is far bigger than the Honey Bees it was hugely out numbered. She was actually far too big to fit in the bee space between the frames and at one point tried to go back into the larger gap between the dummy board and hive wall. The workers clung to her and I think were probably biting her, don't think any actually managed to sting her - perhaps she was too heavily armoured for them. In the end the she managed to fly away.

Tree Bumblebee Queen vs. Honeybee Workers

I'd expected the honey bees to be a bit more proactive on the home defence front with alarm pheromones triggering lots aggro and the mature bees going onto a war footing but that wasn't the case at all, they were no more feisty for the rest of the hive inspection than any other time.