


 |
| If you do pop into Larkins the range of bottled beers is definitely worth a look too :) |

The blog of an urban beekeeper, in Hull, former UK City of Culture.
Wednesday, 29 November 2017
Going to the Pub!
Been a little too busy to update the site lately, however the bees have also had a busy year and the honey crop is in! I shall be at Larkins Bar on Saturday 2nd December 12:00-17:00 selling honey, ticture, honey dippers and polish. That's to the miraclke of technology I also accept card and contactless payments too :-)
Friday, 11 August 2017
Swarm Collecting
This year I've had surprisingly few calls about swarms. None in fact. However in early July an ex posted on Facebook about a swarm in a tree at her parents' so I offered to pick it up. I get free bees, they get no bees, the bees get homed, everyone wins :) I rolled up in the early evening walked to the door knocked and was told I'd just walked straight past the swarm. I looked round and there they were. In a low tree at about shoulder height in a very round cluster - the kind of thing you'd expect to see in a text book.
They were on a single small branch so I thought it's be easiest if I just cut the branch then deposit it complete with the bees in the 5 frame Nuc I'd brought with me. Simple plan. It actually turned out to be a flawed plan. Taking a firm hold of the branch on one side of the swarm I cut the branch on the other side of the swarm as planned. Instead of carefully carrying the cluster to the Nuc and dropping them in I watched the cut branch in my hand bent double dropping half the bees on the floor below. Excellent stuff. I'd gone from having the swarm in a tight easy to move cluster to a couple of thousand bees in a pile on the ground, a thousand or so on a floppy twig and a few hundred on the wing looking to form a new cluster in the tree.
I assumed the bees on the twig were probably the oiriginal centre of the cluster which should include the Queen so I deposited these in the 5 frame Nuc I'd brought along with a frame at either side. I then used another frame of drawn comb to remove the bees from the ground and shake them into the box. They're attracted to the comb so when I held it to the bees on the ground they climbed onto it for me to move them to the Nuc. When I'd got the majority off the ground I turned my attention to the fliers who kept returning to the tree. Giving it a shake here and there to dislodge the landed bees and a few puffs of smoke to mask any pheromone they eventually gave up on it in favour of the workers Nosanoving at the Nuc entrance. I left the Nuc on the ground and returned a few hours later.
When I got back the bees had gone to the Nuc as hoped. There were a lot hanging about outside the entrance though -unsurprising as it was a particularly warm July evening. I used some gaff tape to secure the crown board and used some more tape and a cardboard box to make a cover for the front which would leave room for the bees outside the entrance, after all I didn't want them flying about in the car with me.
It was a slow drive to the out apiary but I got there with relatively few bees getting loose in the car. I carried the Nuc complete with gaff tape and cardboard to the hive stands and removed the packaging. During the drive bees had been coming out of the entrance filling the gap between the Nuc and the cardboard, luckily the gaff tape held for the journey.
I put the Nuc roof in place and left the bees to it. When I did my next inspection I was relieved to find the bees had chosen to remain in the Nuc. I'd used a small National Travel Nuc I had sat in the shed for this lot. It took me a while to locate the Queen. I'm pretty sure she was still a virgin when I caught the swarm as it took me so long to find her and it was a long time before eggs started appearing too. When I did find her I noticed she had a very yellow abdomen compared to most of my other Queens. I considered raising the swarm as a new colony but later decided to use her to replace a swarmy queen in an existing full size colony and united the workers to an existing hive that needed a boost.
 |
| Well bee-haved, ready to be-hived. Beekeeping is 90% punnery. |
They were on a single small branch so I thought it's be easiest if I just cut the branch then deposit it complete with the bees in the 5 frame Nuc I'd brought with me. Simple plan. It actually turned out to be a flawed plan. Taking a firm hold of the branch on one side of the swarm I cut the branch on the other side of the swarm as planned. Instead of carefully carrying the cluster to the Nuc and dropping them in I watched the cut branch in my hand bent double dropping half the bees on the floor below. Excellent stuff. I'd gone from having the swarm in a tight easy to move cluster to a couple of thousand bees in a pile on the ground, a thousand or so on a floppy twig and a few hundred on the wing looking to form a new cluster in the tree.
I assumed the bees on the twig were probably the oiriginal centre of the cluster which should include the Queen so I deposited these in the 5 frame Nuc I'd brought along with a frame at either side. I then used another frame of drawn comb to remove the bees from the ground and shake them into the box. They're attracted to the comb so when I held it to the bees on the ground they climbed onto it for me to move them to the Nuc. When I'd got the majority off the ground I turned my attention to the fliers who kept returning to the tree. Giving it a shake here and there to dislodge the landed bees and a few puffs of smoke to mask any pheromone they eventually gave up on it in favour of the workers Nosanoving at the Nuc entrance. I left the Nuc on the ground and returned a few hours later.
 |
| Almost there |
When I got back the bees had gone to the Nuc as hoped. There were a lot hanging about outside the entrance though -unsurprising as it was a particularly warm July evening. I used some gaff tape to secure the crown board and used some more tape and a cardboard box to make a cover for the front which would leave room for the bees outside the entrance, after all I didn't want them flying about in the car with me.
 |
| Most of this happened in transit. |
 |
| Home sweet home |
I put the Nuc roof in place and left the bees to it. When I did my next inspection I was relieved to find the bees had chosen to remain in the Nuc. I'd used a small National Travel Nuc I had sat in the shed for this lot. It took me a while to locate the Queen. I'm pretty sure she was still a virgin when I caught the swarm as it took me so long to find her and it was a long time before eggs started appearing too. When I did find her I noticed she had a very yellow abdomen compared to most of my other Queens. I considered raising the swarm as a new colony but later decided to use her to replace a swarmy queen in an existing full size colony and united the workers to an existing hive that needed a boost.
Saturday, 17 June 2017
Renewing Brood Boxes
At this years Beverley Beekeepers Auction I picked up an unprecedented 8 Commercial Brood Boxes. After sterilising them it was time to check the joints and add cleats to the sides giving me better handles to move a heavy box with than the rebate handle which is a standard part of the Commercial specification.
The boxes had been made in a variety of styles, some had finger joints reinforced with screws, some had what I think are called rabbet joints which seemed to be glued and screwed and a few had the sort of large finger joint type things I use because cutting all those small fingers is hard work. Of the ten boxes only one had lose corners. It was one with large tab finger type joints and no screws.
After a few minutes with a tee square to hold the corner straight, a drill for pilot holes and a clicky screw driver I put 4 2" wood screws into each corner making it far more solid. The other boxes were all very solid. Not sure how old thy were but some smelled of tar when I was sterilising them so I'd guess they've seen a few years use and being well made I'm sure they'll see a few more years use yet. They all had a little rectangle of wood ground away which I think must've been a brand from a previous owner.
Four of the boxes had rebate handles the rest had handles attached to the outside by now rather rusty nails. Using a clawhammer and a pry bar I removed the old handles and replaced them with longer cleats of tanalised wood. You wouldn't use tanalised wood for hive bodies but stick to the outside of the box I suspect they'll be fine and will live a little longer than untreated wood.
You only really need handles on two opposing sides of the box, but i prefer to put them on all four sides to give me options when I'm moving hives. I actually only put new cleats on six of the ten boxes. Hopefully I've got more than I need and four should be surplus. Once done I painted them all. I used an uneven mix of green, black and brown shed & fence paint to give them an old and worn look as an anti theft strategy and only treated the outer sides.
 |
| Finger Joints and screws, Rabbet Joints with screws and possibly glue |
The boxes had been made in a variety of styles, some had finger joints reinforced with screws, some had what I think are called rabbet joints which seemed to be glued and screwed and a few had the sort of large finger joint type things I use because cutting all those small fingers is hard work. Of the ten boxes only one had lose corners. It was one with large tab finger type joints and no screws.
 |
| Bracing corners |
Four of the boxes had rebate handles the rest had handles attached to the outside by now rather rusty nails. Using a clawhammer and a pry bar I removed the old handles and replaced them with longer cleats of tanalised wood. You wouldn't use tanalised wood for hive bodies but stick to the outside of the box I suspect they'll be fine and will live a little longer than untreated wood.
 |
| Wooden Cleat, glued and screwed |
 |
| Empty Brood Boxes make an excellent advent re playground for cats. |
Thursday, 15 June 2017
Cleanse it with Fire!
After the surprising abundance of Commercial Brood Boxes and frames at this years Beverley Beekeepers' Auction I had a little cleaning work to do. Used beekeeping equipment can be a vector for nasty diseases and viruses so properly sterilising second hand kit before introducing it to the bees is a must.
Normally hive boxes are sterilised by scorching with fire. Gamma irradiation works pretty well too but isn't hugely popular in the UK at the moment. The Hulk was created when Dr Bruce Banner came into contact with Gamma rays which tells us that Stan Lee knows bugger all about Gamma radiation. The cost of acquiring and storing your own radioactive isotopes and equipment pretty much rule that out for most beekeepers over here so I decided to go with fire.
So far I've always used a small butane torch, the kind that uses small metal cylinder you buy from DIY shops. Looking at the job ahead I was pretty sure I'd be blazing through cylinder after cylinder trying to scorch all those boxes so it was time to upgrade. I popped to Toolstation and picked up a gas hose, regulator and torch kit -basically a Roofers Torch but a few quid cheaper for buying it as separate items. With torch ready I then needed a tank of propane. You can get them from garages and they offer much better value for money than buying loads of little disposable canisters. The downside is you need to pay about £40 deposit on your first bottle. I didn't really want to do that. It turns out that because of the deposit system the gas supplier remains the owner of the actual gas bottle and they exchange it whenever you get a refill. This means that scrap merchants won't accept them and you cant take them to the tip, unfortunately nobody ever seems to get a full refund on their last gas bottle so it's a canny move by the suppliers. This means unwanted gas bottles tend to get fly tipped a lot. I had a drive around till I found a nice red 13KG Calor Gas bottle sat doing nothing popped it in the car and took it to a local garage. There I exchanged it for a 6KG bottle of propane saving myself the deposit -and presumably returning a lost bottle to circulation, Everyone's a winner -well me anyway :)
The bigger the bottle the cheaper the gas, I opted for a 6KG bottle rather than 13KG simply because I need to be able to lug it about the patio and at some point it's likely I'll want to take it to the apiary. Something I hadn't realised was that the nozzlethingbit (it probably has a better name, but I don't know it) on the gas bottles are made with a reverse thread so when I tried to attach the regulator turning it clockwise it didn't go in at all. After a light bulb moment I spotted the problem and managed to assemble the thing. With it working I blazed through all eight Commercial Brood Boxes with ease. LPG gives a hotter flame than the butane mix in the small cylinders and with my new torch I was using a bigger flame too. It did take a little getting used to working round the hose though and at one point I singles off a 2" wide strip of hair from my right forearm. Oops. No major damage though.
With the boxes now sterilised it was time to turn my attention to the frames. I decided to boil them in a Soda Crystal solution using one of my Burco Boilers. They didn't fit in completely so it meant boiling them in the solution then turning them over to do the other end.
I stopped them floating up I used the Burco lid as a weight. It took ages to get through all the frames and a few I had left still to do.It occurred to me that the metal boiler was probably losing a lot of heat out of the sides as the evening wore on and temperature dropped so I grabbed a few brood boxes and put them over it.
After boiling each frame was given a quick scrub with a nylon brush in a plastic tub of water and stacked up to air dry. Once thoroughly dried the frames were put into the brood boxes for storage.
 | ||
| Toby surveying the work ahead. He didn't help. |
Normally hive boxes are sterilised by scorching with fire. Gamma irradiation works pretty well too but isn't hugely popular in the UK at the moment. The Hulk was created when Dr Bruce Banner came into contact with Gamma rays which tells us that Stan Lee knows bugger all about Gamma radiation. The cost of acquiring and storing your own radioactive isotopes and equipment pretty much rule that out for most beekeepers over here so I decided to go with fire.
So far I've always used a small butane torch, the kind that uses small metal cylinder you buy from DIY shops. Looking at the job ahead I was pretty sure I'd be blazing through cylinder after cylinder trying to scorch all those boxes so it was time to upgrade. I popped to Toolstation and picked up a gas hose, regulator and torch kit -basically a Roofers Torch but a few quid cheaper for buying it as separate items. With torch ready I then needed a tank of propane. You can get them from garages and they offer much better value for money than buying loads of little disposable canisters. The downside is you need to pay about £40 deposit on your first bottle. I didn't really want to do that. It turns out that because of the deposit system the gas supplier remains the owner of the actual gas bottle and they exchange it whenever you get a refill. This means that scrap merchants won't accept them and you cant take them to the tip, unfortunately nobody ever seems to get a full refund on their last gas bottle so it's a canny move by the suppliers. This means unwanted gas bottles tend to get fly tipped a lot. I had a drive around till I found a nice red 13KG Calor Gas bottle sat doing nothing popped it in the car and took it to a local garage. There I exchanged it for a 6KG bottle of propane saving myself the deposit -and presumably returning a lost bottle to circulation, Everyone's a winner -well me anyway :)
 |
| Flame on Johnny |
 |
| Sterilised woodwork |
With the boxes now sterilised it was time to turn my attention to the frames. I decided to boil them in a Soda Crystal solution using one of my Burco Boilers. They didn't fit in completely so it meant boiling them in the solution then turning them over to do the other end.
 |
| Hot Tub Time Machine |
I stopped them floating up I used the Burco lid as a weight. It took ages to get through all the frames and a few I had left still to do.It occurred to me that the metal boiler was probably losing a lot of heat out of the sides as the evening wore on and temperature dropped so I grabbed a few brood boxes and put them over it.
 |
| Sheltering the Burco in a few Brood Boxes to keep the heat in/ |
 |
| Stack of cleaned frames left out to dry |
Friday, 5 May 2017
2017 Beverley Beekeepers Auction
Sunday 30th April was the Beverley Beekeepers 2017 Annual Auction! I got my first bee colony there in 2011 and it's continued to prove a really useful source of kit. Last year I sold an empty Nuc there, this year I had a few more things to sell and decided to drop them off the previous evening when submissions were being accepted. I was supposed to be meeting a couple of people in town that evening but I seem to be perpetually running late so they probably weren't too surprised when it happened again. When I got there half the hall was already occupied with items for auction the next day. I droped off my stuff and went on my merry way, met people patiently waiting in the pub, hit up a club as you do, went home and the next day I grabbed my chequebook and headed back to Woodmansey. This year I was specifically looking for a few Supers, a couple of Queen Excluders and some spare Hive Tools.
 |
| Auction this way! |
I wandered into the hall as a WBC hive went under the hammer for £25. It wasn't long before a lot of three hive tools came up so I placed a few bids but stopped when they got to a fiver. The hall was pretty full with all.the seats taken and people standing at the end and either side of the stage. An Observation Hive got a lot on interest going for £100, there always seems to be a couple of these at auctions and they seem to sell well. I'm not sure if the buyers actually use them or keep them as curios.
 |
| One of two Display Hives that went under the hammer |
 |
| This is a straw Skep. Bee Hive from the Olde Worlde. Flipped over they make great laundry baskets. |
 |
| A trio of complete National Hives |
 |
| Heather Honey Press |
 |
| My Lots! 37x330ml Bottles, 600 Queen Cups, Conical Honey Filter and Frame Sides |
Eventually we got to the bits I'd dropped off. There was 37 330ml
beer bottles er mead bottles I mean. I've decided to stick to 500ml and
750ml bottles for my home brewing. They're good quality dark brown glass
and someone got a bargain bagging them for a fiver. I also had
two lots of 300 plastic Queen Cups I've had sat on eBay for about a
year, they went for £2 per lot so think I probably broken even on those.
I also sold a conical honey filter that I got at a previous action and
don't think I've ever actually used. My last lot for sale was a box of
mixed shallow frame sides. I've decided to standardise on Manley frame
sides for my supers and these were 20 self spacing and two wide sides.
As usual in the middle of the auction there was a break and everyone headed outside for the live colonies being sold. There were ten colonies in all. I think there was a 5 frame Nuc, an 8 frame Poly Nuc, seven single brood National Hives and one double brood National. The single brood colonies went for about £150 I think. The double brood which was described as 10 1/2 frames of brood, 20 frames of bees and a Super fetched £250. Lot of bees there. If I'd bought it I'd probably split it into two colonies pretty quickly.
 | |
| National Supers, Foundation and Crownboards. |
 |
| Ten colonies, all sold. |
 |
| Double Brood and a Super. Bet somebody had a slow drive home. |
Whilst the bees were selling I had a reconnoitre of the auction floor. There was a tool box with a few bits including three hives tools so I noted the number of that lot and another lot of three hive tools. I spotted a strange little plastic box for one lot which was actually a box of prepared Honey Bee microscope slides, I'd been toying with the idea of making some of these myself and decided to bid on them.
In a box containing quite a strange mix of things including a smoker and soap moulds I found a very innovative entrance reducer/wasp guard. I've never seen one like it before. It has two sides which can be open and closed and a mouse guard over one side. Clever piece of work by somebody.
In a box containing quite a strange mix of things including a smoker and soap moulds I found a very innovative entrance reducer/wasp guard. I've never seen one like it before. It has two sides which can be open and closed and a mouse guard over one side. Clever piece of work by somebody.
 |
| Innovative Entrance Reducer |
As bidding resumed a few flat slotted Queen Excluders sold then the framed excluders I was waiting for came up. Turns out a lot of people wanted those and I didn't win them either. The toolbox with the hive tools sold and I finally got the other lot of three hive tools for a tenner, got to wonder where those bidders were when the first set of three went for a fiver earlier in the day but such is the unpredictable nature of auctions.
 |
| Motorised Honey Extractor |
The Motorised Extractor went for £310. The seller was someone who'd recently ceased beekeeping and was getting rid of their kit. An Easi-Steam came up but didn't meet it's reserve. I have one of these myself and think it's the bees knees. A Honey Settling Tank got a lot on interest too.
 |
| A Honey Settling Tank and a Heated Capping Knife |
I bid on some metal frame runners but lost out so shall be ordering some online eventually. Frame runners make it far easier to manage frames in the Brood Box than having the lugs sat on the wooden rebates, they also reduce the chances of a bee getting squished when you put a frame back in the box. Most of my Brood Boxes have metal runners that came with some Easi-Pet Cedar Supers but some still have plastic runners which will melt when I scorch them.
Another mystery lot was a set of 6 small wood and metal cages. Evidently for some sort of thymol treatment for varroa. I'm not entirely sure how they work but I'd guess a thymol treatment possibly goes in the cage then it sits on top of the colony. A couple of people bid on those so presumably they knew a bit more about them.
Another mystery lot was a set of 6 small wood and metal cages. Evidently for some sort of thymol treatment for varroa. I'm not entirely sure how they work but I'd guess a thymol treatment possibly goes in the cage then it sits on top of the colony. A couple of people bid on those so presumably they knew a bit more about them.
 |
| Mystery objects |
I won the microscope slides for £6. They're from Brunel Microscopes Ltd who are still selling the same set for slightly less, but I saved on poastage. Looking at their site they have a few other interesting slides on offer and may get a bit of custom from me.
I'd noticed a few brood boxes at the far end of the hall but hadn't paid them any attention, when we reached them I was surprised to hear them described as Commercial and joined the bidding. Most people still prefer the smaller National size hive so there weren't many people bidding on them. I think only myself and two others were interested in them. I got a lot of three for £15 and stood on for the next batch of three.
 |
| Commercial Brood Boxes complete with 12 frames each. |
So that was six Commercial Brood Boxes at a fiver apiece. Later we got
to some more Commercial Brood Boxes each with a compliment of 12 frames
in each. There were two of us bidding on them. I got two lots of two
boxes and frames for £5 per lot whilst the other chap got three lots of
the same. They were varying in build quality, from some with perfect box
joints on the corners to a couple with a few screws in the corners. A
few had rectangular abrasions were presumably the previous owner's brand
had been sanded off or something. After
scorching, scraping, a little attention to a couple and a lick of
paint they'll be ready for use again.
Boxes of jars proved popular as ever. Not the most interesting things to bid on but everyone needs them to sell a honey crop. After being a bit disappointed with Compak South Ltd shipping me a couple of broken jars last year then not responding to contacts or making any effort at redress I decided to pick some up here for less and got two boxes of 72 jars each. Saving 30p per jar on the pound jars and a bit more on the smaller jars. It sounds a bit trivial but really adds up when you start selling a few.
Amongst the very last lots were two bundles of ten Commercial brood frames. I picked them up for £3 each. One set appears to be unused with the wedge still in place and the others had been cleaned up. I'll still be sterilising them all anyway to be safe.
Boxes of jars proved popular as ever. Not the most interesting things to bid on but everyone needs them to sell a honey crop. After being a bit disappointed with Compak South Ltd shipping me a couple of broken jars last year then not responding to contacts or making any effort at redress I decided to pick some up here for less and got two boxes of 72 jars each. Saving 30p per jar on the pound jars and a bit more on the smaller jars. It sounds a bit trivial but really adds up when you start selling a few.
 |
| Free Worker Bee with a stack of empty Commercial Brood Boxes |
 |
| Two sets of ten Commercial Deep Frames, £3 a set. |
I noticed a few differences his year compared to previous years I've attended. Usually there's a lot of used Nucs being sold but not this year, possibly linked to my other observation that most of the bees sold were in full size colonies rather than Nucs this time. There were also less lots of random bits of kit lumped together than previously.
I've started to notice a few patterns to auctions. The bidding is busier towards the start when there's more bidders so it's worth submitting items as early as possible to get as good a sale price as you can. Conversely as a buyer you can get some bargains if you hang about to the end as people have spent up or gone to settle up their bills before the queue gets too big. The two sets of Commercial Frames I picked up were the second and third to last lots and definitely worth waiting around for.
At the end of the day I spent £98 and came away with ten Commercial Brood Boxes, 71 Commercial Frames, three Hive Tools, 144 jars and a set Microscope Slides. The items I sold off went for £16 which after the 10% auction fee comes in at £14.40. Loading the car took a while as I'd not planned to buy anything bulky and had 4 plastic crates still sat in the back, Took me a couple of tries to get everything in but I got it all home in the end.
 |
| Loading the car was tricky, hadn't planned to buy much. |
Thursday, 27 April 2017
Auction this Sunday
The Beverley Beekeepers Annual Auction is this Sunday, 30th April 2017, at Woodmansey Village Hall.
As well as being an important date for local beekeepers it tends to draw people from further afield too. Last year I went to get some bits and bobs and came away with a complete National Hive full of bees as it was too much of a bargain to pass up.
 |
| Go there! |
Monday, 17 April 2017
Start of the 2017 Season
Whether you're following Meteorological or Astrological Seasons we're definitely into Spring now. Frogs have been spawning and the newts are getting a little frisky.
The winter was very mild, Spring too. Unfortunately out of my eight colonies three didn't make it through Spring. My money is on Varroa as the mild Winter probably meant the bees were raising brood through most of Winter allowing the Varroa to continue reproducing when there's normally a break. The mild winter also delayed Oxalic Acid treatment till February, I'm pretty sure the bees will have had some brood when I did that too which will have reduced the effectiveness of the treatment - it only affects adult mites living on the bees, mites in the comb with developing bees are affected. I started the season treating the remaining hives with Apiguard but mite drop was so low I discontinued it after giving the first treatment two weeks.
I did my first proper hive inspections on 3rd of April. At the Apiary the hives were surprisingly prolific for the time of year. Straight away I had to carry out an artificial swarm for one colony who as well being heavy on bee numbers had already made a swarm cell with a developing larvae in it. My plan is mainly to perform vertical artificial swarms and later reunite colonies but as I've lost a few colonies I'm initially going to be increasing numbers so I did a regular artificial swarm moving the Queen Cell, brood and young bees to another hive and leaving the old queen and foragers in the original hive. A week later I checked the artificial swarm again to remove the emergency Queen cells the workers threw up following the manipulation. The original swarm cell was capped at this point and should be emerging about now.
I also remarked a couple of Queens who's marks had worn away making them harder to spot. Those Posca Paint Pens are easier to use than paint and a brush but doesn't seem as durable. Last year the official colour for Queen marking was white, it doesn't stand out too well against comb and brood though so I used a metallic pink instead. This year's colour is yellow which will stand out even less against wax, bees and pollen so I've decided to go my own way again and use a bright orange paint pen.
I'm now a couple of inspections into the season and I've got supers on all the hives, one has two on now and I've done another artificial swarm too. Whilst the Spring losses were the worst I've had so far the surviving colonies appear to be thriving at the moment and one is making some real headway on filling the supers too.
 |
| Frogs have been busy |
 |
| Couple of Newts, my ponds are full of life. |
The winter was very mild, Spring too. Unfortunately out of my eight colonies three didn't make it through Spring. My money is on Varroa as the mild Winter probably meant the bees were raising brood through most of Winter allowing the Varroa to continue reproducing when there's normally a break. The mild winter also delayed Oxalic Acid treatment till February, I'm pretty sure the bees will have had some brood when I did that too which will have reduced the effectiveness of the treatment - it only affects adult mites living on the bees, mites in the comb with developing bees are affected. I started the season treating the remaining hives with Apiguard but mite drop was so low I discontinued it after giving the first treatment two weeks.
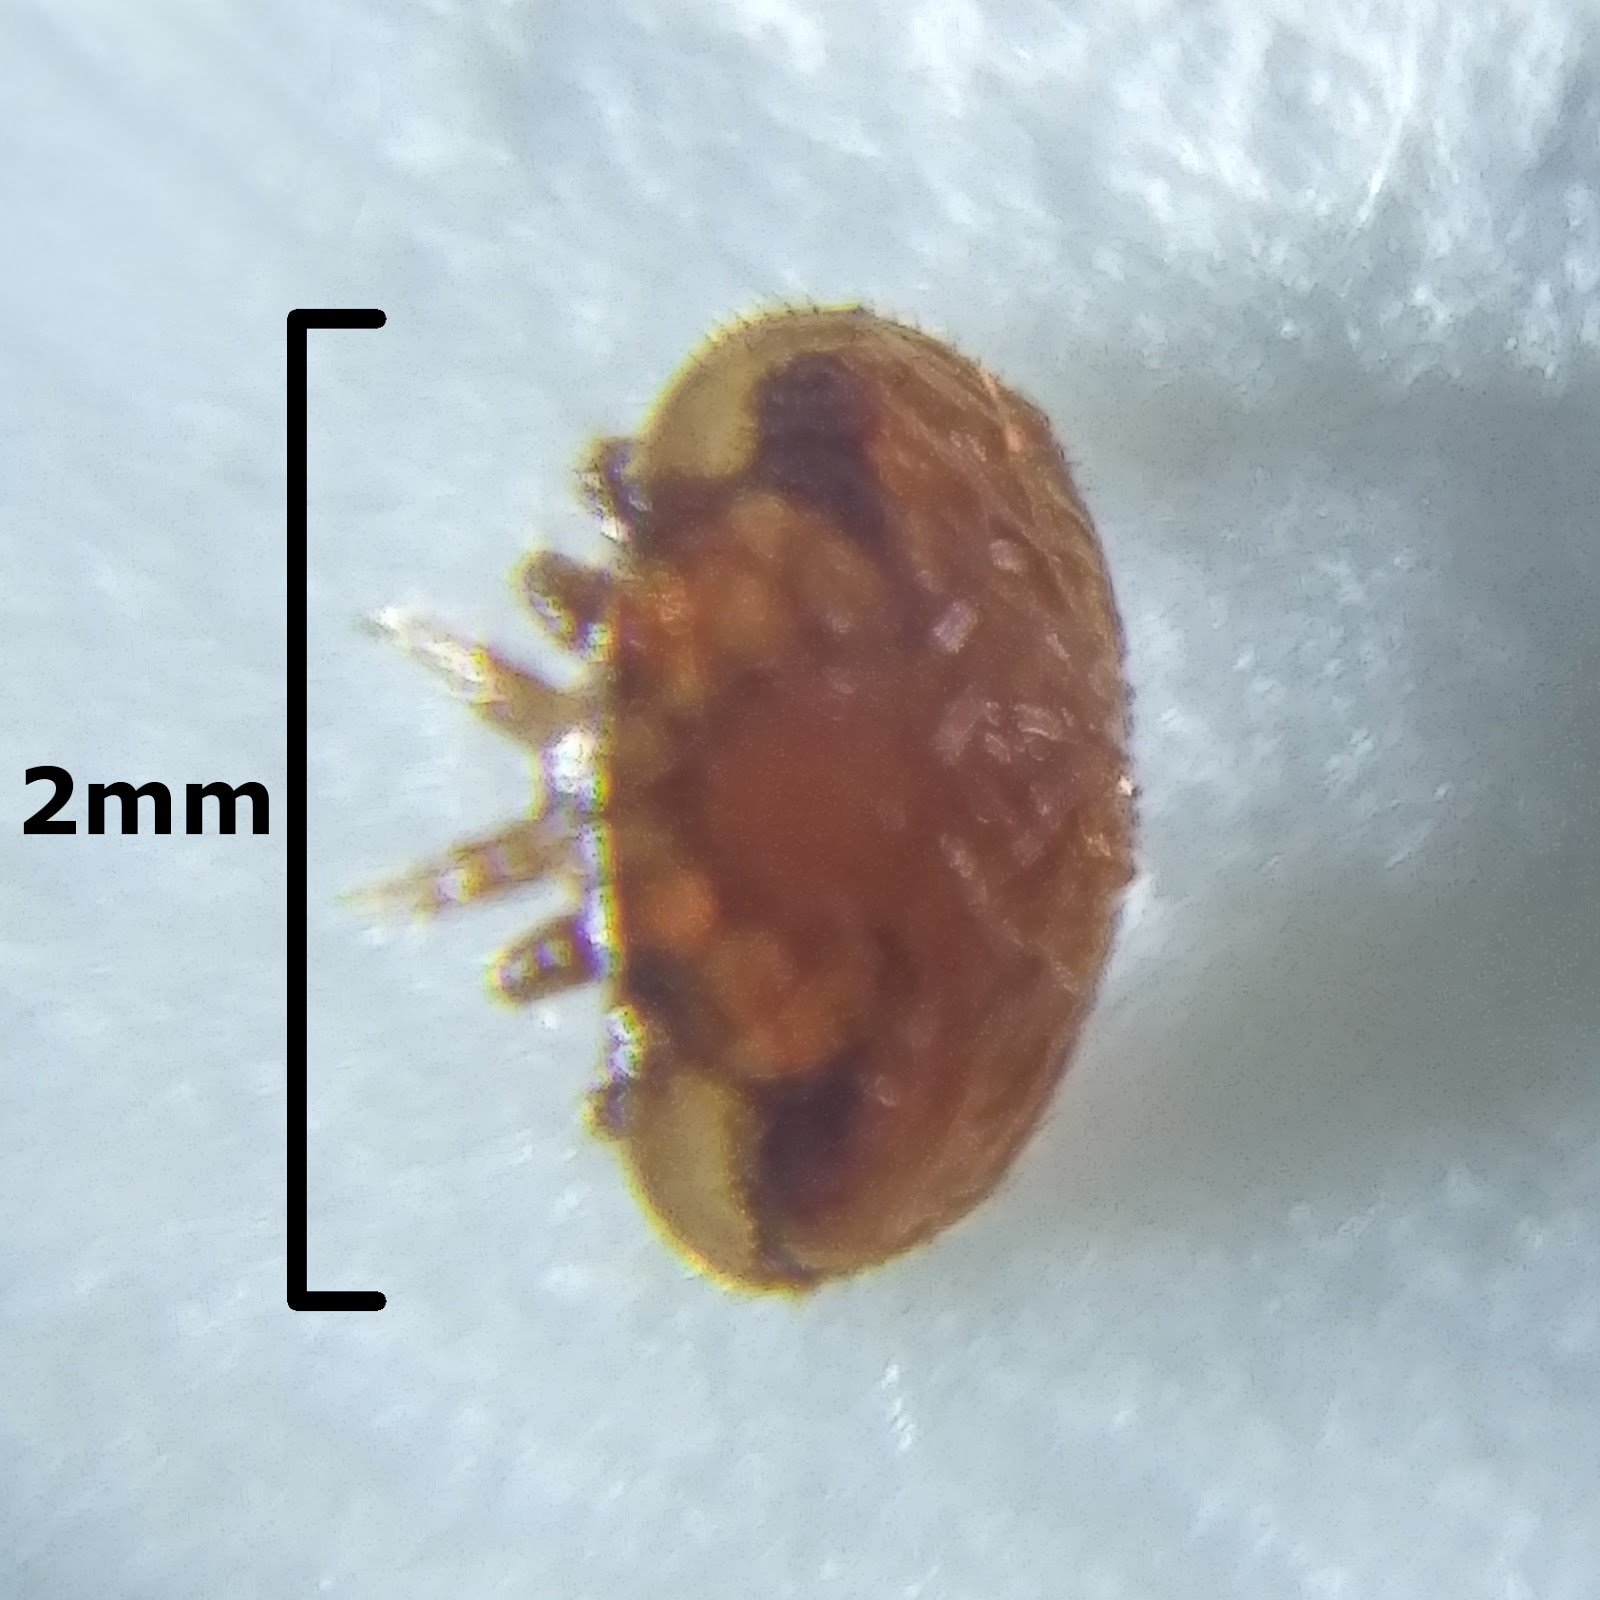 |
| Adult Female Varroa Destructor. She's been in an alcohol bath in my fridge for a few years. |
 |
| Capped Queen Cell |
I also remarked a couple of Queens who's marks had worn away making them harder to spot. Those Posca Paint Pens are easier to use than paint and a brush but doesn't seem as durable. Last year the official colour for Queen marking was white, it doesn't stand out too well against comb and brood though so I used a metallic pink instead. This year's colour is yellow which will stand out even less against wax, bees and pollen so I've decided to go my own way again and use a bright orange paint pen.
 |
| One of last years Queens being remarked. |
Monday, 20 February 2017
Warmer Weather
 |
| Spring is in the air, and on the ground. |
Worker gathering water from mud.
Despite the media's claims last that we were in for the heaviest snowfall in years (again) it's been a very mild Winter (again) so some of my colonies are looking far more populous than I'd expect for the time of year so once inspections start next month I'll be expecting swarming signs fairly early on in some hives. Still need a couple more brood boxes to be able to do Artificial Swarms on all the hives but I've got a few Nucs too so can split a few colonies if need be.
Thursday, 2 February 2017
Winter Feeding and Mite Teatment
Through winter the bees are all busy keeping warm, clustered in their hives away from the prying eyes of beekeepers. Barring a bit of hardware maintenance, woodwork and renewing Beekeeping Association subs there isn't much for Beekeepers to be doing. However there are two bee related tasks still to be done: mite treatment and Winter feeding.
The mite treatment as with every other year is an organic acid treatment which kills off a huge proportion of the varroa mites in the hive. There's a couple of options but most beekeepers seem to be using an Oxalic Acid solution. It's easy to make, just dissolve 35g Oxalic Acid Dihydrate in one litre of sugar syrup -most sources say to use 1:1 syrup but 2:1 syrup has been used by some. The hive is then opened and the syrup trickled between the frames directly onto the bees. As the bees move about the solution gets distributed over the whole colony and onto the mites. It takes 5ml per seam for a National hive and by my calculations 6.6ml per seam for a Commercial. It's only effective when the mites are actually on the bees though so needs to be done then the colony is broodless. If there's brood most of the mites will be in the comb with new larvae and the oxalic solution won't reach them. Waiting for a long enough cold snap took a while but I treated my colonies about a fortnight ago.
Oxalic solution is very cheap and easy to make at home, unfortunately it's no longer legal for beekeepers to do so. Last year a firm called Api-Bioxal registered it as medical product so now any treatment with
Oxalic Acid needs approval from the Vetinary Medicines Directorate.
This means you can't just whip up your own solution or buy it from just anyone anymore, you need to buy the approved and expensive VMD approved product. The approved Api-Bioxal currently costs £10.99 for a 35g sachet of what is clearly Oxalic Acid Dihydrate, if you shop around and source your own >99.5% pure Oxalic Dihydrate you get about half a kilo for that price. So the cost of treating my 8 hives with Api-Bioxal comes to about ninety quid whereas using other Oxalic Dihydrate I'd be paying under a fiver. Not that I'm suggesting anyone does ..obviously I used the super expensive pricey approved stuff and the photo above shows a bottle of
lemon barley water I was drinking at the time and the syringes were just so I could drink it
through the veil of my beekeeping jacket. Honest.
I've not seen my bees for a long time, what with it being winter and all but opening hives in Winter is quite different to Summer. In the summer bees tend to be distributed allover the comb in the brood box but in winter they form a rounded cluster and when you remove the crownboard you can clearly see the shape of it. All being well the cluster moves in the hive using stored food from the combs.
When I was doing the treatment I found four of my colonies are still very densely populated with huge clusters whereas two are like the one above where there's been some of the expected die back and two are looking very low on numbers. The two colonies that are low on numbers may struggle to generate enough heat so I whilst I've so far left the mesh floors open with those two I closed them to try an conserve heat -I very much doubt they'll make it through Spring but shall wait and see.
In Winter hives can be running a little low on stores -especially big strong colonies that haven't experienced much die back through Winter. Because of that it's fairly common practice to give the colonies a little food top up. Bees won't take syrup when it's cold so instead the beekeeper can give them dry sugar or fondant. In previous years I've made candy boards which are effectively huge square sugar lumps covering the top of the hive so the bees have access to emergency food wherever they are in the colony. I had planned to make newer shallower candy boards but never got round to it so this year I've gone back to fondant again.
 Fondant can be given in a block, as it comes from the packet, placed above the feed hole in a crownboard with a plastic food tub above it which I've done previously. This time I decided to just cut the Dr Oetker Ready to Roll Icing very thinly and place it above the frames in the small gap between the frame tops and the crownboards. With the fondant in place the crownboards, insulation and roofs were quickly put back in place so the bees could get back to warming the air in there.
On Monday just gone I popped to the out apiary and was able to see bees making cleansing flights although according to my weather app it was only 7 degrees Celsius. It's been a fairly warm winter so far, which isn't great for the bees. In a cold winter they're less active and cluster tighter using less food, when it's warmer they're more active which means using up more energy and depleting food stores faster. In early Spring I'll need to check how much they've got left as that's the time they're at most risk from starving.
The mite treatment as with every other year is an organic acid treatment which kills off a huge proportion of the varroa mites in the hive. There's a couple of options but most beekeepers seem to be using an Oxalic Acid solution. It's easy to make, just dissolve 35g Oxalic Acid Dihydrate in one litre of sugar syrup -most sources say to use 1:1 syrup but 2:1 syrup has been used by some. The hive is then opened and the syrup trickled between the frames directly onto the bees. As the bees move about the solution gets distributed over the whole colony and onto the mites. It takes 5ml per seam for a National hive and by my calculations 6.6ml per seam for a Commercial. It's only effective when the mites are actually on the bees though so needs to be done then the colony is broodless. If there's brood most of the mites will be in the comb with new larvae and the oxalic solution won't reach them. Waiting for a long enough cold snap took a while but I treated my colonies about a fortnight ago.
 |
| Mite treating time |
 |
| Can see the roughly round shape of the cluster here. |
I've not seen my bees for a long time, what with it being winter and all but opening hives in Winter is quite different to Summer. In the summer bees tend to be distributed allover the comb in the brood box but in winter they form a rounded cluster and when you remove the crownboard you can clearly see the shape of it. All being well the cluster moves in the hive using stored food from the combs.
When I was doing the treatment I found four of my colonies are still very densely populated with huge clusters whereas two are like the one above where there's been some of the expected die back and two are looking very low on numbers. The two colonies that are low on numbers may struggle to generate enough heat so I whilst I've so far left the mesh floors open with those two I closed them to try an conserve heat -I very much doubt they'll make it through Spring but shall wait and see.
 |
| You can order anything, as long as it's sugar. |
In Winter hives can be running a little low on stores -especially big strong colonies that haven't experienced much die back through Winter. Because of that it's fairly common practice to give the colonies a little food top up. Bees won't take syrup when it's cold so instead the beekeeper can give them dry sugar or fondant. In previous years I've made candy boards which are effectively huge square sugar lumps covering the top of the hive so the bees have access to emergency food wherever they are in the colony. I had planned to make newer shallower candy boards but never got round to it so this year I've gone back to fondant again.

Bees making cleansing flights, must be quite a relief for them.
On Monday just gone I popped to the out apiary and was able to see bees making cleansing flights although according to my weather app it was only 7 degrees Celsius. It's been a fairly warm winter so far, which isn't great for the bees. In a cold winter they're less active and cluster tighter using less food, when it's warmer they're more active which means using up more energy and depleting food stores faster. In early Spring I'll need to check how much they've got left as that's the time they're at most risk from starving.
Tuesday, 31 January 2017
Don't get stung buying honey online
 |
| Don't get stung, read This Guide. |
So if you ever buy honey online or plan to do so I suggest you make yourself a cup of tea and read on..
Guide to Buying Honey on eBay
Avoiding scams and unsafe products
The health benefits of Honey are lauded and it's a hugely popular food and health product but Honey is unfortunately also one of the most frequently abused and adulterated products you'll find on the supermarket shelf. Supermarket shelf? Yes indeed. In December 2015 The European Commission published preliminary results of a study into Honey fraud in 30 countries including the UK (JRC-IRRM, 2015). Of the 2237 samples tested 19% were either from the wrong plant, wrong part of the world or were adulterated with sugar, and a further 13% were suspected of sugar adulteration or of different geographical origin to that claimed. What does this mean? It means Honey fraud is so prevalent even big business is being caught out, but that doesn't mean you have to be.
The situation online: A number of small scale Beekeepers and Honey sellers in the UK and abroad use eBay to reach customers, myself included. It's a great way to do it. It lets you reach a large customer base and allows customers to access more choice than the supermarket channels allow. You want Honey from your own city or home county? Try eBay. You want Honey from Yemen? Try eBay for that too! The choice is there and so are the customers. Everyone's a winner.
Adultery?
Unfortunately not everyone is a winner. As mentioned above Honey is not always what the label claims. Adulteration with cheap syrups (corn syrup, rice syrup, etc) is unfortunately nothing new and was touched upon in the 2007 documentary film The Vanishing of the Bees (Langworthy et al, 2011) and is still a reality as the European Commission study has shown (JRC-IRRM, 2015). Whilst commercial supply chains are working to avoid this it still happens to them and when you're buying direct over the internet from anonymous sources there are even less safeguards in place.
Location, location, location?
As mentioned earlier the European Commission found a lot of Honey on shelves isn't from the geographical region given on the label. Initially this might not seem relevant to you however due to different Beekeeping practices around the globe Honey from some countries can contain substances you probably don't want to eat -such as high level of antibiotics (Al-waili et al, 2012). In the UK Beekeepers don't have access to unprescribed antibiotics, but elsewhere in the world its a very different story and there's even been a ban on Honey from specific countries being imported to the European Union due to the high levels of antibiotics in their final product. Despite that it still slips into commercial channels occasionally having been transshipped. Buying direct from a seller who imports or buys honey from unknown sources with no accountability and no audit trails increases your chance of buying Honey that couldn't be sold in a supermarket. Unless you want particularly want tetracycline, oxytetracycline, doxycycline, chlortetracycline or chloramphenicol on your toast or in your tea you need to know where your honey is coming from.
Is it really Organic?
As well as Honey being adulterated or mislabelled regarding content and origin another fraudulent claim often made by sellers is that their Honey is Organic.
For a product to be sold as Organic in the UK, whether produced locally or imported, it needs to be tested and certified as Organic by one of the UK's 9 organic control bodies (Department of Environment, Food & Rural Affairs, 2016). It is completely illegal to claim your product is Organic without this certification. Certified Organic products then bear a logo on the label to show it is Certified Organic as who it was certified by, looking on eBay at so called Organic Honey check for a Certified Organic logo. You won't find it for two reasons.
The first being bees are unlikely to forage exclusively on organically reared plants. Foraging bees free range over an area of about 28 square miles around the hive and the bee keeper has no control over what food sources they use in that area. In such a large area it is very unlikely that all the plants the bees access are being grown organically, so to produce Organic Honey one needs huge swathes of land which a small operation is unlikely to have access to. It's not impossible for example hives may in a large unmanaged woodland but it's unlikely.
The second reason is that getting Organic Certification for your product whether it's Honey, wine, potatoes or whatever is a very expensive process and needs repeating every year. The cost of Organic Certification places it well beyond the financial reach of the small scale beekeeper as well as all but the biggest commercial Bee Farmers. If a beekeeper or Honey seller is using eBay as their distribution channel they won't be selling a Certified Organic product, if they claim to be then they're either misrepresenting their product intentionally or do not understand Honey or the relevant food legislation all of which ought to be a red light for potential buyers.
What about Manuka Honey?
Ignoring the arguments abut the pros and cons of Manuka honey, the fact is people want to buy Manuka Honey and Manuka Honey is expensive as so little is currently made per season. This has led to a huge industry in fake Manuka Honey. New Zealand produces about 1,700 tons of Manuka Honey in a season but 10,000 tons are sold annually (Creasey, 2014). This means 4 out of 5 jars don't really contain Manuka and that's before factoring the large percentage of Manuka bought up by the pharmaceutical industry before it even reaches the jar. To protect their product New Zealand formed the Unique Manuka Factor Honey Association (UMFHA). There's over 70 suppliers registered with UMFHA (UMFHA, 2016) so if you are buying Manuka Honey online check the UMFHA website to ensure it's coming from a licensed source.
So what can you do?
So how do you avoid buying fake, dodgy or adulterated Honey? It's not easy but here are a few things to look at when buying online to help you buy safe, high quality honey.
The Seller: Try and make sure you buy direct from the Beekeeper selling their own honey rather than some guy moving a few buckets of Honey of unknown provenance they picked up at an auction or imported from who knows where and labelled as whatever they like. It's actually not that difficult to tell who is a beekeeper and who's not: look at their other items. Bees don't only make Honey so chances are a Beekeeper on eBay will be advertising other items made from the produce of their hives such as Beeswax Polish, Lip Balm, Wax, Propolis possibly even Bees and beekeeping equipment. Other clues may be in their About Me page if they have one. What does it tell you? Do they have a website, blog, Instagram or Facebook page for their small scale beekeeping operation? You could even just ask them -beekeepers tend to very happily talk about their bees and beekeeping practice.
The Honey: How much honey are they actually selling? There's at least one seller on eBay claiming to be a beekeeper who appears to have sold about 80 tonnes of honey using a number of different adverts. Selling that quantity of honey it would make more sense to do so through commercial channels rather than deal with the financial overheads of eBay fees, Paypal fees and postage as well as the considerable cost in time and effort to pack and process that many single jar sales. The fact they're selling such quantities in this way should ring a few alarm bells for the potential buyer.
The Label: There are strict laws about food labelling (The Honey (England) Regulations, 2015). A jar of honey must be labelled with the word Honey, a metric measure of weight, the country of origin, a name and address for the supplier and a best before date. If the Honey is being sold through a third party it must also have a batch number.
If you’re seeing jar advertised on eBay with a label that doesn't meet these criteria then the seller isn’t following legislation set by the Food Standards Agency to protect the public. If a seller is ignoring or unaware of this they really should be avoided. If you see a seller claiming their honey is organic but doesn't have any Organic Certification they're fraudulently misrepresenting their product and should also be avoided.
The Cost: Producing Honey takes work and an investment in both time and money. If you’re seeing Honey being sold for roughly the same price as a tin of Golden Syrup with free postage thrown in chances are you’re not getting what you think.
There are no guarantees but these are just a few ways to reduce your chances of being ripped off or buying something unsafe.
References
Al-waili N,Salom K, Al-Ghamdi A. & Ansari MJ (2012) Antibiotic, pesticide, and microbial contaminants of honey: human health hazards. The. Scien. World. J.; doi: 10.1100/2012/930849.
Creasey S. (2014) Special investigation manuka honey. The Grocer 28/06/2014 p41-45.
Department of Environment, Food & Rural Affairs (2016) Organic farming: how to get certification and apply for funding.
JRC-IRRM (2015) Coordinated control plan to establish the prevalence of fraudulent practices in the marketing of honey. Preliminary results. December 2015.
The Honey (England) Regulations 2015 (SI 2015/1348)
Langworthy G., Henein M., Erskine J., Gazecki W. & Page, E. (2011). Vanishing of the bees. Hive Mentality Films & Hipfuel Films.
UMFHA (2016) UMFHA Members . Unique Manuka Factor Honey Association website.
Monday, 30 January 2017
Hull Bees Honey now on eBay!
I've had a few enquiries to the Hull Bees Facebook Page from people wanting to buy my honey who live outside the city so finally I've put some on eBay. There's 454g/1lb and 250g/8.8oz jars of both set and liquid honey.
It does mean charging a little more per jar and getting a smaller return per jar than selling locally but allows me to reach a bigger customer base and puts in in the reach of people who can't pop down to West Hull for a jar or twenty. I'll add a link to the banner above at some point.
In other news my Honey is still available at The English Muse on Newland Avenue and I've recently dropped off a batch of Propolis Tincture at Broomsticks, also on Newland Avenue.
 |
| Hull Bees Honey, now on eBay! |
In other news my Honey is still available at The English Muse on Newland Avenue and I've recently dropped off a batch of Propolis Tincture at Broomsticks, also on Newland Avenue.
Friday, 20 January 2017
Hamilton Converter
Been a while since I've posted about my beekeepery wood butchering efforts. Back in April last year I bought a colony of bees at the Beverley Beekeepers' Association Auction. They came in a National Hive and I've since moved the bees onto Commercial frames which are larger. The floor and roof the hive came with I can use with Commercial boxes but the Brood Box I don't have a use for as it is. However it can be altered to take 8 Commercial frames using a device called a Hamilton Converter. I don't know anything about Mr or Mrs Hamilton but the Converter sits on top of the National Brood Box raising it's height by 5 cm with a rebate for frame lugs alongside the box's thinner walls making a box with enough room for 8 Commercial Frames.
Plans for a Hamilton Converter seem to be strangely absent from the Internet, however a few beekeeping suppliers make them so after looking at a couple of pictures online and checking National and Commercial Brood Box measurements I was able to knockout a rough plan for one. I was on my phone at the time and used Google Keep to rough it out. Never used Google Keep before, it's a note making app that handles a variety of media and includes a drawing faciltiy which I'll be using again.
The sides that fit in the rebates on the National could be made up using separate pieces but I decided to make them from one piece each. I initially made all the sides 460mm long then later trimmed the thinner sides down and cut rebates in the wider sides so I could make rabbet joints.
All four side pieces needed a rebate cutting along the length, the thick sides needed one at the bottom alonwing them to slot into the rebates already in the brood box, and the thinner sides needed rebates at the top to accommodate the frame lugs and runners. I used the tablesaw to cut the rebates the whole length of two pieces of wood. Once cut I then checked the outside edges of box thick and thin sides lined up. There'd be no point proceeding if they didn't.
That done the corners of the bottom of the wide sides needed trimming to fit into the National as the rebates stop at the outside edges. Hard to follow? I thought so.
Between steps I kept checking things fitted together and lined up. I wouldn't like to say if it was due to my careful design, craftsmanship or blind luck but everything did.
With the wide sides in place I then trimmed down the thinner edges so they would overlap the wide ones by 20mm at either end, more or less. I used the sides to mark where to cut the rebates for them to fit into so it didn't matter too much if they weren't exactly the length I was aiming at. I also labelled each corner with a letter from A to D to ensure I was using the sides in the rebates I'd measured for them. It gets a little confusing and it's very easy to cut off the wrong part of the wood. I like to mark the offcuts with a big X to make that a little less likely.
With the wooden parts assembled it was time to add some metal runners. These protect the edge of the box and by reducing the amount of surface the frame lugs are resting on make it far easier to manage heavy frames when the box is in use. The runners are made to go in a regular size box not a weird cut down hybrid thing like this so I needed to trim them. Rather than dig out a tape measure I just held the runner to the Converter and marked in pen where to cut then lopped the end off with a hacksaw. I then used the shorter runner to mark where to cut the other one.
After trimming both runners had lost a nail hole. To replace those I just used some radio pliers to hold a nail in place whilst I knocked it through the runner with a hammer then pulled the bent nails out for recycling. I could've probably used a drill but this was quicker and less messy with no metal filings.
That done I nailed the new shorter runners in place. The radio pliers came in useful for that too as the nails were too short to hold and I didn't fancy banging my fingers on a cold January evening..
Finally with the woodwork and metal work done it was time to throw on a coat of paint. I've had some ideas about colour coding hive parts to make them more recognisable at a glance and decided to make this a different colour to all the other brood boxes as it's only going to hold 8 frames instead of 11. Mixing a little reddy brown, green and black I wound up with a nice choclate brown colour which I now think would look good on all my brood boxes ah well..
It was about 3 degrees Celcius outside and my Shed & Fence paint
says not to apply it below 10 so I decided to do the painting indoors. I nipped out and bought a newspaper for the occasion and used it to line a big black plastic tray to contain any spillages. This turned out to be a great plan because at one point I did manage to knock over the yoghurt pot I was using as a paint caddy. Oops.
I decided to give the old National Brood Box a lick of paint too, to give it some protection from the elements. With the box finally finished it's gone to wait in the shed till it's needed again. Ideally you should have two brood boxes for each colony you intend to keep so you can artificially swarm them, at the moment I have eight colonies and four spare brood boxes although I also have a few Nucs I can use to split colonies into.
 |
| One National Brood Box minus frame runners. |
Plans for a Hamilton Converter seem to be strangely absent from the Internet, however a few beekeeping suppliers make them so after looking at a couple of pictures online and checking National and Commercial Brood Box measurements I was able to knockout a rough plan for one. I was on my phone at the time and used Google Keep to rough it out. Never used Google Keep before, it's a note making app that handles a variety of media and includes a drawing faciltiy which I'll be using again.
 |
| My rough plan for a Hamilton Converter |
 |
| Cutting rebates |
 | |
| They line up ok. Little victory. Although that upside down 9 should be an 11. |
 |
| Cutting corners |
 |
| Test fit. |
 |
| Marking up rebates for the joints. |
Finally I had all four pieces cut to size. With all the rebates and lugs the wide edges took a total of ten cuts each not including cutting the length.
 |
| I've made a flat pack. |
All the wood cut to size I then used wood glue and screws to assemble it using the National Box and a huge wood clamp to keep it all in place. For the screws I drilled guide holes with counter sunk heads and lubricated the screws by putting wood glue in the threads. I trimmed some smaller pieces from offcuts and glued them into the ends of the rebates to tidy things up a bit. There's 3 screws per corner which along with the glue is probably overkill.
 |
| We're not finished yet. |
 |
| Metal Tin Bucket, as seen in the July 2016 edition. Wow. |
 |
| Making new nail holes. |
 |
| Runner in place. |
 |
| Lower left? Yes, I did knock the paint over. |
 |
| One National Brood Box converted to an 8 frame Commercial Brood Box. |
I decided to give the old National Brood Box a lick of paint too, to give it some protection from the elements. With the box finally finished it's gone to wait in the shed till it's needed again. Ideally you should have two brood boxes for each colony you intend to keep so you can artificially swarm them, at the moment I have eight colonies and four spare brood boxes although I also have a few Nucs I can use to split colonies into.
Subscribe to:
Posts (Atom)