Showing posts with label Beehive. Show all posts

Monday, 14 November 2011

Green Hive Roof mk.II

When I first set up my hives I had the intention of giving them green roofs. I posted a blog about the green roof on Hive1 back in June 2011. It looked good, I'm pretty sure it insulated the hive below nicely, was aesthetically pleasing, helped my hive look a little less obvious to bee paranoid neighbours and even gave the hive proper a little more shelter from the rain. However it was heavy, especially after a rainfall. My solution was to replace the large box with two smaller ones. I was initially considering using aluminium as it's light weight and fairly strong. The two problemns there were I havn't got a clue who could make the items from aluminium and as someone pointed out on a BBKA forum plants don't fare too well in aluminium containers -possibly to do with heat and cold I guess.

Stage one. Not quite done yet.
I opted for a material I've used a little bit before and know where to source. Wood. Specifically gravel board, a treated peice of wood meant to go at the bottom of a wooden fence to protect the fence from the damp ground. I still don't have a decent work surface so once again I got out the mini vices and used a double hive stand weighted down with breezeblocks and a cat.

Stabilise wobbly worksurfaces with breezeblocks and cats as required.
With my still worryingly unstable worksurface I cut the boards to size. My plan was to have three sides of the box hanging over the edge of the metal roof skin and somehow magically join them together once the boxes were in place then unconnect them when I needed to remove them so I could lift of half a green roof at a time.

Testing the fit.
As you can see I used mortise and tenon joins on the corners and a handfull of nails to hold them together. What you can't see is I also used some wood glue on the joints and to hold the pieces together as they dried I used a few staples too. With my prototype green roof it had orignially had a solid marine ply floor but I quickly discovered it was too heavy and cut out most of the floor to leave a frame around the edge to support a two layer lightweight plastic floor. I decided to do the same thing with these to help keep the weight down. I figured I could just use one layer of correx on these as they're so much smaller too. Satisfied with the fit on the hives on the roofs I added a shelf along the long side of each box held in place with yet more glue and nails. Next step was painting the boxes to match the hives. I decided to cut a corner at this point and poured a few litres of shed and fence paint into a bucket then dipped the submerged box ends in using a brush to work the paint across the long sides that hadn't been submerged. It worked okay giving me a pretty good coat of paint. It was also incredibly messy and took days to dry. As the wood was already treated the paint was just an aesthetic touch really.

Green Roof boxes. They're now green.
On the shelves I put a single layer of correx board with the internal walls running the short distance across the gap for support. Correx is the type of plastic FOR SALE and SOLD signs are made of. You can buy the stuff, but if you're lucky you can sometimes find it in the street or in a skip. The black plastic liner was just an offcut of pond liner. I folded the liner into place and used brass drawing pins to secure it. Once they're filled with the growing medium and the plants the contents will hold the liner in place so I'm not too concerned about the pins falling out later in their lives.

I then had to give a little thought to how I was going to joing the boxes to keet them in place. In the end I got some hasps from B&Q, they were the priciest part of the project and I needed one per box. I glued them into place then used the supplied screws to secure them properly. There was nothing to secure the hasps so I just drop a nail into each which seems to work adequately.

Green Hive Roofs Mk.II
The last stage was to add the growing medium and some plants. Once again I opted for mostly perlite as it's lighter than soil, and planted a mixture of sedums, some rockery plants and a few other things I felt might survive in the green roof boxes -over the course of a year they'll probably experience flood and drought conditions. I also transplanted all the plants from the original roof garden into these. It's not really the best time of year for plants to be getting used to a new container but I figure nature will take care of it and whilst some of the plants will quite probably die back others should survive and grow to fill the gaps left. They look nice enough, as the perlite settled I added some vermiculite to the top. Regarding further development I may at some point think about adding a mechanism to allow running off excess rain water, but for now I shall wait and see how they fare.

Friday, 11 November 2011

Space board

In the last really exciting installment of The Hivemind and Me I wrote a bit about follower boards which provide a litttle insulation to help the bees make the most of their space in the brood box. As it gets colder the bees are going to need a little more insulation than that. Hot air rises so I think a little insulation on the top is called for. There's various options to choose from all with different rationales. For example the Warre Hive uses a cloth placed on top of the fames with a 'quilt' of wood shavings on top, whilst other people like to wrap up their hives in black insulation giving them a Pulp Fiction Gimplike look. Obviously what you opt to do depends by and large on where you are, for example a bee keeper in Kenya probably doesn't loose much sleep over winter snows, high winds and sudden drops in temperature whereas in Siberia it's possibly a little more relevant.

However I'm in neither Kenya nor Siberia but the North East of England, I can't ignore insulation but at the same time don't need to go overboard. What we normally use in our homes is a thick layer of fibreglass wool, more recently there's been various kinds of fibreglass and polystyrene insulation boards coming out too. It's a good idea to avoid added a surface which water can condense on when you're insulating a hive. I opted to use Knauf Space Board Loft Board Insulation which is a 52.5mm thick extruded polysyrene board giving insualtion equivalent to a 27cm thickness of glass wool. Part of my reason for using this is that it's good insulation but also with it being so robust I can just stick a square of the stuff on a crownboard and drop the roof back on top of it.

Knauf  Space Board.
Traditionally used by beekeepers since the dark ages.
Honest. Really.
I popped to B&Q and bought one board which was large enough to cover both hives with insulation to spare. I just cut out two squares using a long craft knife and a crownboard as size guide then cut out a rectangle in the middle the size of a chinese takeaway box. I then pulled out this smaller rectangle and cut in two pieces across the thickness so I have a removeable portion to allow winter feeding with sugar fondant which I can then place some insulation back on top of..

The problem with this stuff is when you cut it little crumbs rub off. I don't really fancy a garden covered in bits of orangey pink extruded polystyrene and don't think the bees particularly want a hive full of the stuff either. So out came the blow torch and with the lightest brushing of a flame all those little bits of polystyrene shrunk back into the main body.

I'm contemplating putting a thin polystyrene tile over the rectangular cut outs as some heat may escape from the cuts, there will be a ventilated 20mm gap between the top of the space board and the underside of the roof. In the case of these two hives I'll also be putting green roof boxes above the metal skins which will mean a little more insulation above the roof.

Wednesday, 9 November 2011

Follower Boards

Through the year I provide a little insulation to the bees in the form of follower boards at the front and the back of the hive. Their job is to provide a bit of insulation for the outer face of the frames facing them. Without them in place when you push the frames together in the middle of the hive you'd also have a large gap at either end and the queen might decide those areas are a little chilly for her royal sensibilities and decide not to lay eggs on the outer two faces of the brood frames.

Follower Board in Brood Box

These are just thin pieces of plywood cut to more or less the shape of a brood frame and dropped one at either end of the rows of frames.

Follower Board. You could train a monkey to make these.
The board reduces what would be a large gap at either end of the frames to a bee space on the side of the frames, and creates a seperate air gap between the board and the hive wall. Without the boards in place the bees produce burr comb in the gaps at either end of the frames but with them in place whilst they still have access to the gap behind the boards they seem to consider it to be outside of the hive proper and don't make any comb -just like the space above a crownboard.

Follower Boards in use
I suppose they're a little like secondary double glazing, except you can't see through them, they're in a beehive and nobody knocks on your door trying to sell you them.

Monday, 12 September 2011

A Foray Into Carpentry

Something every bee keeper needs, other than a bucketful of stinging insects, is spare stuff. You need spare supers for the honey season and you need spare brood boxes for various swarm manipulations as well as housing more bees if you expand. Thanks to the auctions, eBay and Fragile Planet I have 6 supers and doubt I'll need more for a long time, however I don't have any spare brood boxes and as I use Commercial ones which are (currently) less popular than the Modified Nationals most of the nation favours there's less places to buy the things from and they're not cheap.

So I figured I'd make my own. My woodworking skills are very limited, I can more or less operate a hammer and a saw, but that's prettymuch it. A brood box is basically a box with the floor missing, so how hard can it be? I did two terms of woodwork at Driffield School, during that time they taught us bugger all. Well that's not quite true, they taught us how nails work, what glue does and that cellulose sealer smells funny. I'm pretty sure I already knew the first two and I've yet to find a use for knowing the third.

The first thing I needed were some hive plans. For the princely sum of £1.70 I was sent an A4 sheet of card printed on both sides. It might sound a bit steep for a piece of card printed on both sides but the fact is it should save a half decent carpenter a lot of money. You know what they say: give a man a fish and he'll eat for a day, teach him to make his own beehives and he can eat fish every day until he loses a thumb in a carpentry accident. Anyway if you want to make one yourself here's my own one sentence commercial brood box plans: Using 22mm thick wood make a box with no bottom measuring 465x465x270mm on the outside, cut a 10x11mm rebate along the inside top edges of two parallel sides. That's it.

The sides are meant to be joined by mortise and tennon joints. Mortise and tennon joints seem very useful things to know how to make. Unfortunately I didn't have a clue how to make them -still not sure which is the mortise and which is the tennon (or is it tenon?). Youtube to the rescue! In 4 minutes 50 seconds this guy taught me more than two terms of woodwork in a rural secondary school ever did. I also needed to know how to cut rebates, that was another mystery solved courtesy of youtube with a little help from wikipedia, turned out I needed something called a rebate plane or rabbeter plane.

Next thing I needed was some tools. I already had a drill, hammers, tape measures, nails, glue, woodfiller, a pencil and one of those right angle measuring things the name of which I forget -T square perhaps? It looks like a capital "L" and I pulled it out of council skip years ago. I needed a work surface, a vice, a tennon saw and a coping saw. However I wasn't buying a workbench and I'm not forking out for a proper vice. After a few minutes on eBay and I'd ordered the cheapest coping and tenon saws the world's marketplace had to offer and two mini vices. The two mini vices were cheaper than one proper vice and didn't need bolting to my worksurface. I also ordered a grandiosely named "Professional Duplex Rebate and Fillister Plane" for the princely sum of £17.50. The plane turned out to be a counterfeit Stanley No.78 Duplex Rabbet Plane -someone's taken a mould of one and is knocking out copies, it even had the Stanley model number embossed on the body so I was able to locate a pdf of the instructions for it. As for a worksurface I figured I'd use one of the hive stands from the auction.

Next up was some wood to make the thing from. Cedar is the best stuff to use, but hey if I wanted the best I wouldn't be banging this thing together myself would I? I've bought ply and recycled pine supers from Fragile Planet and they seem fine so I figure, as long as I treat the outside, pretty much any wood would do. So I went with whatever the local shop had -pine possibly? The sides are meant to be 270mm high and 22mm wide and I couldn't find that anywhere. However it turns out that all the wood in my local wood shop is displayed with incorrect measurements. So a 25mm piece of wood is 22mm thick -I have no idea why, maybe it's some tradesman secret to stop amateurs being able to build anything properly?

My first mistake was using a battery powered jigsaw to cut the lengths of wood to size. A battery powerred jigsw is great if you're in a hurry, but don't mind waiting 8 hours for the bloody thing to charge up. Mine was B&Q's cheapest offering from a few years ago and doesn't have an edge guide making it almost impossibleto cut a straight line with it. Still if you're in a hurry, can wait 8 hours and don't mind a slant to all your cuts then it's the business.

Improvised Workbench
Anyway I needed planks of wood 270mm height but the closest I could get was two pieces adding up to 286mm high, after a little thought I planed in a 16mm rebate in each where they met then used glue and screws across the rebates to join them together. I'd not used a plane before, it turned out to be pretty simple but fairly hard work. I suspect it was really such hard work because my worksurface was about 10" from the ground and wobbled like crazy. There's probably knack to using a plane so it doesn't keep getting clogged up but I didn't figure it out.

Cutting a Mortise or maybe a Tennon
After making the sides the right size I then had to cut the mortise and tenon joins. At this point I discovered that the cheapest tenon saw eBayers could import from Hong Kong was a little dangerous, with a blade given to unexpectedly folding during use. After straightening the thing for the third time I gave up and opted to use an old garden saw I've had kicking about in the shed for the past decade. I also found that the cheapest coping saw in the world evidently came with some the worlds cheapest blades which kept twisting and snapping during use. A trip to Mac's Tool's on Newland Avenue got me a pack of new blades for just under 2 beer tokens.

The box went together fine although the joints weren't too pretty what with the lengths being a little out thanks to the convenience of power tools. Used a bit of glue and some 2" aluminium nails leftover from restoring the original hives to reinforce the joints. Added a little wood filler on the gaps where the joints looked shoddy -as I won't be using the box till next summer at the earliest I figure that any VOCs in the filler or glue will be long gone by then. Treated the outisde with Shed & Fence paint and ended up with a functional brood box, not bad for £9 worth of wood, £1 of screws, and possibly another £1 worth of glue and filler.

First Homemade Brood Box
I figured I could probably do better than that, and could probably use a second spare brood box anyway, so I popped back to the local wood shop and got another two planks of wood, once again ignoring their measurements and measuring them myself. The wood and screws weighed in at £11 this time, not sure why but they've let me have some off cuts for free in the past so I can't complain. This time I decided to cut them manually using my ancient garden saw.

Think I'm starting to the hang of this
Without the wonders of technology I managed to cut the edges nice and straight. Clamped the pieces to the long edge of a hive stand, stabilised it with a couple of breeze blocks and started planing. It took a couple of hours and I finished in darkness but managed to get them all done in an evening.

Second Homemade Commercial Brood Box
After a wait for some decent weather I glued the joints, drilled guide holes through the mortises or maybe the tennons -whichever the bit that sticks out is called anyway, then banged in some galvanised clout nails . I did use a little bit of wood filer here and there but not a lot. I reckon the result is far neater than my first attempt in fact.

Prior to this I'd knocked together some flatpack supers and made up some clearer boards and follower boards, not very challenging stuff. Both brood boxes are functional, bee tight and hold the frames as intended without letting the wind whistle through. I'm pretty certain that with a decent work surface, meaning one that's more than 10" off the ground that doesn't wobble like a weeble in an earthquake, it'd be a far easier job to do and to get more accurate cuts and angles. I could have got a flat packed Commercial Brood box from Thornes delivered for £49.88 (or assembled for £63.51). This little project cost me £40 on tools and about £24 on materials so for two boxes I've saved quite a bit and obviously I still have the tools for later use.

Monday, 15 August 2011

Nearby Hives

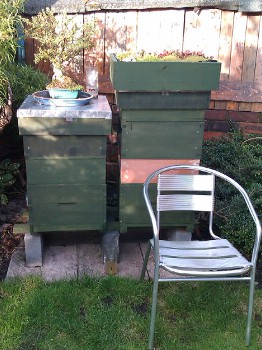
Over the summer whilst the bee populations have increased, the hives have also physically grown. One has a deep and a shallow super whilst the other has a shallow super. They've both got extra boxes on top as ekes.

My hives with a chair for scale

 There's a Wildlife Garden at Pearson Park with two hives. For reasons best known to themselves they've gone for two completely different hive types.

WBC Hive
This is the William Borough Carr hive (WBC) which is probably what most people think of when they picture a beehive.  From what I've read they sound like a complete pain to use compared to other hives -but they do look nicer and having double walls is good for insulation. However they are slightly smaller than Nationals. Some people like them, some people don't, but beekeepers don't seem to agree on anything so that's not too surprising. I think these hives are behind wire mesh to stop visitors getting themselves stung by annoying the bees.

Top Bar Hive
The Top Bar Hive (TBH) is really popular in developing countries, particularly Africa. You can make them yourself fairly easily using whatever's available and rather than using a complete framed piece of foundation for the bees to make comb on all you give them is a wooden bar with a line wax to get their attention, the bees can then draw their own comb. It's often touted as a more natural way of beekeeping than the modular hives with wooden frames and unlike the WBC, National and Commercial types it doesn't need boxes adding and removing so it's probaby easier on your back and means you don't need a couple of warehouses to store your empty supers in. I don't have a clue how you go about managing one of these but I'd assume it's very different to the modular hives. Being horizontal it has a larger footprint than the modular hives.

Saturday, 4 June 2011

Green Hive Roof

A while ago I read something on the net about green roofs. I thought they were a pretty good idea, I'd also read that a beehive may need some insulation to keep the heat in over winter and in the summer the sun on the metal roof skin can make things pretty uncomfortable for the bees inside. So I figured why not put a green roof on the bee hive? It should provide insulation, it'll be more aestheticaly pleasing and it'll possibly reduce the amount of attention the hive draws from neighbours.

My first attempt at a green hive roof
Turns out nobody seems to sell them so I needed to do a little research then make one myself. I read all about the different layers used for drainage, growing medium and whatnot and thought it sounded a little complex. I figured with it being such a small area I could just ignore all that technical stuff anyway. So off I went and bought some exterior plywood for the bottom and some wood for the sides.Treated the sides to match the hive and made basically a box with the sides dropping an inch below the floor. This then sits on top of the hive's proper roof and won't slide off. Unfortunately it was too heavy so I cut out most of the floor leaving a frame in which I stuck two layers of correx.

I then lined it with pond liner underlay, pond liner and another layer of underlay and flilled it with mostly perlite, a little soil and some vermicompost. I'd read that sedums are the things for a low maintenance green roof so bought a few and some nice grassy looking stuff. Popped it all in the box and slapped it on the hive. It's all doing rather well. Mostly I let the rain water it but I've added a litre or two of tap water myself now and then to help it along. As you can see from the picture it's doing fine, and certainly looks nicer than the metal square with a brick on the top type roof common to many hives. When I want to work the hive I just lift it off and pop it on the floor then remove the regular roof which is still underneath, in the photo above you can see hive2 still has a bare metal skin.

It is a little on the heavy side in fact and I suspect the wooden sides won't last forever so my plan is eventually to make a new version using two halves, each being a watertight rectangluar box with a lip on three sides that completely cover the hive roof and clip together in the middle. I'm thinking of maybe using aluminium for this so it'll last longer and have thinner walls. That'll have to wait till I have some spare cash kicking around though.

I occassionally see bees investigating the sedum flowers on it, posibly even gathering pollen or nectar, and I think they may use it to identify their hive. At the moment the second hive has a large bonsai tree sitting on top of the roof, looks nice and holds the roof down but obviously doesn't insulate much.

Roof space

Wednesday, 30 March 2011

Frames. Something's not right.

OK the hive is ready, the frames have been taken apart and scorched, boiled and cleaned with flames, harsh chemicals and elbow grease. I'm pretty certain no germs survived that. Next thing is to get some foundation and reassemble the frames. Whilst Googling for information on foundation I came across this table of foundation sizes courtesy of Paynes Bee Farm. Looking at the table and looking at my frames I began to think something wasn't quite right. My frames looked too big, and the shallows were quite blatantly more than 5" deep.
After a lot of head scratching and little measuring I realised that the hive I'd bought wasn't actually the hive I'd thought. I'd believed I'd purchased a national hive with two shallow supers. But I hadn't. What I had was a Commercial brood box and the two supers were actually National brood boxes. Oops. That's a huge hive. Well I hadn't seen a beehive in real life since the introductory course and re reading the advert for the hive as it was advertised it was pretty clear that the seller knew nothing about beekeeping himself so the advert hadn't been too clear. In the immortal words of everyone's favourite jaundiced everyman Homer Simpson "D'oh!"

Still whilst I have 2 National brood boxes and their frames as well as the Commercial boxes and frames having read a lot about brood and a half and double  brood boxes I've come to the conclusion that a Commercial brood box is probably the way for me to go. When I get bees they'll be in a National nuc. National frames are smaller than Commercial ones, but seriously cable tying some wood to pad out the frames isn't really rocket science is it. Yes, I'm one of those people who's happy to blaze their own trail ignoring the conventions of the nation.

I decided to bin off the Queen excluder I'd got with the hive as although it was a nice wooden framed one I didn't think I had a hope in hell of sterilising it without melting the plastic grille -not with the resources I had to hand anyway. I also needed a couple of new bits of frames to repalce a few that broke during cleaning as  well as the foundation -I also wanted to make up a short frame in the hive to do the sacrificial drone brood varroa control thing, so I decided rather than wait on mail order I'd make a road trip to Thorne to pick up the bits I needed. Postage on anything bee related seems kinda pricey anyway. So off I went to get a plastic queen excluder various bits of Commercial and National frames and foundation for Commercial Deep, Commercial Shallow (for the drones) and National Deep frames.

Thornes shop in Wragby managed to elude my satnav but I found it eventually. It was rather strange actually. It's like a beekeeping supermarket with prettymuch everything in it except customers, and bees. Yep I was the only customer there -well it was a weekday I guess. Anyway I got my gubbins then drove off home to make up the Commercial frames I anticipate needing later.

Incidentally the old comb that I pulled out of the original frames I melted and strained, now I have a half kilo block of beeswax in a plastic bag. I gather I can't let the bees have it in case of disease so at some point I'll hopefully exchange it for foundation.

Saturday, 19 March 2011

The Hive

Having read "Bees At The Bottom Of The Garden" by Campion and Hodgson and "Get Started In Beekeeping" by Waring and Waring I decided to take the plunge and buy myself a beehive. On eBay I found some guy selling a load of 'refurbished' beehives -brood boxes, 2 supers, all frames, roof, floor, feeder, crownboard and queen excluder. It took a few weeks to arrive (forever in eBay terms) but eventually I got the postcard to say a courier had tried to deliver it whilst I was out so off I went to pick it up and haul it home.

It was held together with a ratchet strap and wrapped with pallet wrap. First problem was the ratchet strap. I've never used one before so had no idea how to loosen it. A couple of minutes with Google and I had it removed. So here's the hive it it's glory:


Looks pretty good in that picture really. However it was actually in a pretty poor state. The seller's idea of refurbished was closer to what I'd call knackered. The boxes were all pretty loose, plenty of cracks scratches and dents in the wood too. It was  also full some suspiciously dark looking drawn comb, and quite a lot of straw, wood shavings and other random crap from the farm building it'd been stored in -still it was a bargain. I ordered a varroa mesh floor from Fragile Planet and figured I'd better get a second brood box and roof in case I needed it for swarm control later so got them from the same chap in pretty much the same sorry state.

Cleaning up the hive took ages. I pulled out all the frames and cut out the drawn comb with my trusty bolo machette (a must for both the garden and the kitchen) then dissassembled each frame and scraped off the remaining wax, removing bits of wire and nails as I went. Having done that each piece of wood was scorched with a butane torch then boiled in some very strong caustic soda. My housemate wasn't too impressed with the huge pan of caustic soda sat in the kitchen for a week, and by the time I finished I'd got some fairly impressive chemical burns on my arms so she was quite right tobe concerned really. After being allowed to dry the parts were then soaked and scrubbed in a soda crystals solution and rinsed with hot water. The scrubbing was pretty back breaking work but I wasn't really going to take any chances with giving my new bees a hive with disease in it.

Boiling frame parts in caustic soda
To fix up the boxes and roofs I scorched them very thoroughly with the butane torch. I found some large aluminium nails in the back of my local hardware shop where I also picked up some wood filler. After drilling guide holes I banged the nails in to get the boxes good and square, then woodfilled the cracks. I decided I wasn't sure abot the fibreglass roof skins so I pulled them off and scorched underneath then and ordered some metal skins to replace them. Of course the metal skins didn't quite fit so it took a few hours with the lump hammer before I got them on -as well as a tube of no more nails, some short clout nails and a bit of drilling. Must be great living next to me!

I decided to treat the wood but didn't really know what to use. The floor I'd got from Fragile Planet had a nice green treatment on it so I emailed them and asked what it was so I could paint my 2nd hand stuff the same. They replied pretty promptly saying it was a standard fence paint which I could get from B&Q or Home Depot, helpful folks I'll use them again. So off I went for a few litres of green shed and fence paint.

Treating burnt wooden boxes
I gave all the external surfaces two coats of the stuff. I also added a little roof cover across the front of the brood box complete with drip groove as some my neighbours mistakenly believe that leaving a light on all night deters thieves and I figured that'd confuse the bees -as well as make it easy for potential thieves to see what they're up to. Incidentally if I see someone stood outside a house at night with the garden light on I'll think nothing of it, whereas if I see someone stood outside a house in the dark using a torch that really will get my attention. Turn those lights off people -have a look at the International Dark Sky Society website for a few more reasons why you should be doing this anyway. Anyway getting back on topic after adding a landing board to the varroa floor the hive was pretty much finished, just needed to pop foundation in the frames and then get me some bees.