Tuesday, 29 January 2013

Schrodinger's Bees

Winter is a period when beekeepers don't do a huge amount of hands on beekeeping. It's a good time to clean up kit, drink some mead, pad out your blog with book reviews and so on but as far as contact with the bees go there's not a lot. Whilst beekeepers do their best to ensure their colonies will survive the winter we do seem to end up a with a Schrodinger's Cat sort of situation. Are the bees in the boxes alive or not? There's a lot that can happen to them over the winter. They could starve if they didn't have enough food stored or warm snaps made them use up what they had too quickly, they might get damp and die, varroa load may be too high or some other pest or illness may have wiped them out.

Anyone alive in there? Knock once for yes, twice for no.
I occasionally pull out a stethoscope and have a listen to my colonies just to be sure they're still alive in there. Hopefully the bees have been living on the honey stored in the comb of the brood box, but that may be running low by now so many beekeepers will feed their colonies a nice lump of fondant icing after xmas. Actually I got an email from Fragile Planet last week advising customers to feed their bees this winter. However I'd given mine some fondant back in November just in case it was needed and as I checked recently I was able to see most of it still there, it may be a little dry but condensation inside the hive should provide water to allow the bees to use it.

Lotta sugar and 3 bees. The brown stuff is a supplement.
Another thing beekeepers do when it's cold is pour acid on their insects. Sounds a bit strange, I know, but it's for the benefit of the colony. It's intended to kill the varroa mites. Normally most of the mites will be safely tucked away in the capped brood along with the bee larvae they're feeding on, however when it's too cold to raise larvae the queen stops laying eggs so the mites hang about on the adult bees instead at which point they're more vulnerable to varroacides, specificall organic acids applied to the bees directly. The January edition of the BBKA News advised waiting for a period of cold weather with an average of 5 degrees Celsius, lasting three weeks so any capped brood will have emerged. Then as the cold snap comes to an end you trickle a 3.2% oxalic acid solution and 1:1 syrup onto the bees between the combs. The bees between the combs are called a seam, and the figure people go by is 5ml of solution per comb. I suspect that's actually based upon the population of standard National hive brood box really and it may be that in a Commercial like mine you should use a little more but I decided to go with 5ml per seam for now. I think I read somewhere that the acid damages the mouthparts of the varroa leading to their demise, many believe it also does some harm to the bees but less than the varroa would do and given the short lifespan of individual bees shouldn't be a significant problem for the colony as a whole. The figure bandied about for efficacy of dribbling oxalic acid onto the bees seems to bea reduction of about 90% in the colony's varroa population.

Do not drink me.

A very weak solution of Oxalic Acid is used for this, other organic acids can be used such as Formic or Lactic Acid, but Oxalic is currently in vogue. It's legal status seems a little confusing to me, the choice of these organic acids as varroacides seems to be based upon them not having a defined Maximum Residue Limit like regular pesticides. I gather these organic acids occur naturally to some degree within bee colonies anyway and unlike other varroacides don't leave a residue affecting the hive products. It's not difficult to make up your own solution, but if you get it a bit wrong it could be a disaster for your bees either by not killing enough mites or by damaging the bees themselves -and do you really know how accurate your kitchen scales are? I doubt it.

If you really want to know more about varroa control DEFRA have a 44 page document available called Managing Varroa that you can download and includes Oxalic Acid treatments. There's other ways to administer organic acids such as spraying or vapourising the stuff. Vapourising seems wonderfully dangerous giving beekeepers the chance to find out first hand how much damage of a lungful of vapourised acid can do to a person, whilst simultaneously being less effective on the varroa. The advantage of vapourising it is it's faster to do than dribbling, although that doesn't take into account time spent waiting for an ambulance and further time spent recuperating after burning your lungs out.

Back to my bees. I've never used oxacilic acid before but you administer it by dribbling it from a syringe. It just so happens I'm no stranger to drawing up and administering solutions in syringes, and it's easier without a needle involved.

My table needs a clean
Today the temperature below the hives was 8 1/2 degrees Celcius, the warmest it's been for a few weeks so I decided to apply the acid -it was also due to expire next month too. After lighting the smoker and popping on my smock and veil I decided to treat the bees in the nuc first. As I said above it's hard to know how the bees are doing over winter despite best efforts in the lead up to winter so it was something of a relief when I removed the nuc's crownboard to see bees in there under the fondant and more coming up from the seams to see why some fool was opening their hive in late Janury.

They're alive!
There looked to be four seams full of bees. In the photo you can see three of them, the edge seam on the left was also full of bees but they'ed propolised the top edge so you can't see them so well in the image. The two seams on the right were more or less empty of bees. Interestingly (slightly) the left side of the hive is more exposed with the right side facing Hive1 so I'm assuming they found it easier to keep warm on the left of the hive than the right. I drizzled 5ml of oxalic and syrup solution into each of the four occupied seams making 2 passes for each (2 1/2 ml per pass) rather than drowning them by trying to apply it too quickly. I had some spare brood frames with honey on that I'd stored in the summer in case it was needed in the winter. Rather than disturb the frames the bees were on I prised out the rightmost frame to assess their stores but found it still had capped honey in it, so I guess they're not short of food and that probably explains why they've shown little interest in the fondant so far. Closing up the nuc I cracked open Hive1 where I was greeted by a few bees and saw them crowded into the seams again. I drizzled 5ml of solution into each seam before moving on to Hive2.

"It's January, put the lid back on you muppet!"
In Hive2 I could still see some grey bits of Api-Life Var on the outer corners of the frame tops. This is a crumbly material holding thymol (thyme essential oil) which as it evaporates kills varroa but not bees -although it does annoy them. Normally the bees would have broken it up and thrown it out of the hive by now but with the cold weather I'd guess it's not been evaporating so I pulled them out. There were a few bees on top of the frames and investigating the fondant. Not too many though. If there'd been a lot of them then it would be an indicator that they were starving -I suspect they'ed've eaten the fondant before that was a problem though. Once again I trickled the solution over the bees and closed up. You can see in the above photo the bees are towards the far side of the hive rather than in the middle.That side of the hive whilst nearer the entrance is more sheltered from the elements as it face a garden wall whereas the other side faces the garden. Evidently they've chosen the warmer side of the hive to cluster in. Hive1 had done the same.

Oxalic acid applied and all the hives closed up again I popped to Pearson Park for a quick run. Apart from an occasional check on how much fondant they have left I'll be leaving the bees alone from now till spring.

Saturday, 26 January 2013

Wireless Weather Station

A useful thing for beekeepers to know is the weather -specifically the weather near the bee hives. You can generally tell a lot about the weather by looking out of the window -or in the case of snow looking at your Facebook news feed and seeing umpteen people have posted "It's snowing" "Yay snow!" "Gonna write my name in yellow!" and so on. However the actual air temperature and humidity level you probably can't tell from looking. Given that everyone and his dog seems to have a smartphone these days a lot of people have access to a current weather report at their finger tips, however unless the service you're using has weather monitoring station located slap bang in the middle of your apiary there's a good chance the conditions reported won't be quite the same as conditions where your bees are. For example in Hull some bright spark thought it would be a great idea to place a weather station on the dock, it's more exposed than most of the city and it's near a large body of  water so tends to give temperature readings a little lower than the rest of the city.

My bees are located in my garden and as I don't have a vast sprawling estate (yet) I can use an off the shelf Wireless Weather Station. Basically a remote temperature and humidity sensor which transmits on a radio frequency to a base station located in your home. They generally have ranges of a few tens of metres so should be just right for the garden. There's a lot of different models to choose from and if anyone wants to do their research I'm sure there's reports and reviews of most of them n the web. I didn't tho. Today whilst in Tesco I noticed they had on reduced from £20 to £15 and on an impulse decided to get one. The one their selling 'Exclusively from Tesco' is the Technika WS 2121P Inverness Weatherstation. Who are Technika? Seems to be a subsidiary of Tesco. I own a Technika digital camera actually, it's pretty crap to be honest and I gave up on it after a couple of days. Anyway on a whim I picked up one of their Weather Stations.


Technika Weather Station -complete with fake security tag
Notice the box has a big sticker on it saying Security Protected? Well it isn't really. I paid for mine at the self service bit and wandered out without getting any security tag deactivated. Examining the box I found there's no device in the box or behind the sticker to activate a sensor. Maybe someone's realised that a sticker saying "Security Protected" is cheaper than an actual acoustomagnetic strip or RF tag and about as effective. I don't imagine many shoplifters go back to return their loot when those door sensors start beeping as they exit.

Anyway back to the Weather Station. It's made in China. I think it's a little disingenuous having Inverness printed on all six sides of the packaging and China on one, perhaps calling the device Zhenjiang or Nantong would been more appropriate.

I popped in some batteries -not included, but also sold in Tesco, I didn't buy mine there tho. Two AA size in the base station and two AAA in the remote. I noted the base station was showing a remote temperature and humidity reading and so set the time and date. Great. My plan was to pop the remote under one of the hives so I could see the air temperature the bees are dealing with at any given time. However I noticed that the temperature on the remote wasn't the same as that being displayed for it on the on the base station, they were both indoors but the reading I was seeing was obviously from outside. I figured Tesco are probably selling a lot of these units, they have a range of 30m so there's a good chance it's picking up someone else's remote. That was exactly what was happening. It didn't occur to me till later that my own should've been a stronger signal as it was nearest the base station anyhow. To avoid reading the wrong remote the devices support three frequencies so it's not a huge problem. I switched to the second frequency but got nothing, I tried the third frequency, still got nothing. Either my remote wasn't transmitting or my base unit wasn't receiving. I suspect the problem may have been the remote given that I was able to read somebody else's on the base unit using channel 1.

There's two things wrong with this picture.
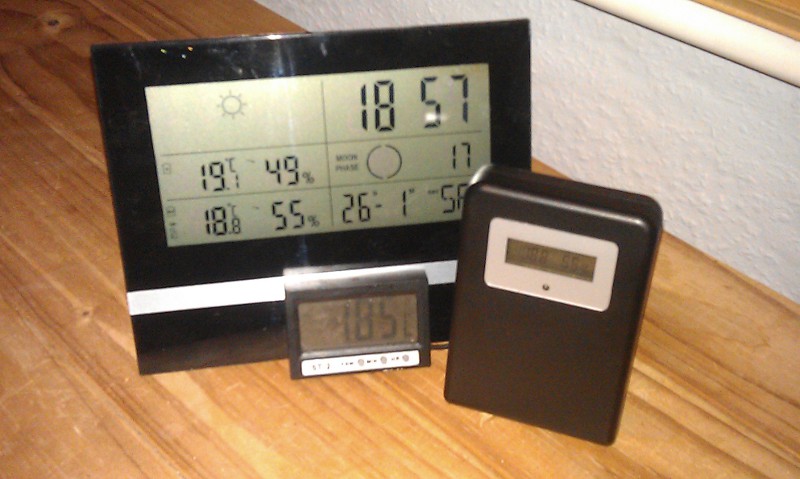
As you can see from the picture above despite being right next to the remote the base station isn't getting a reading from it -if it was it'd be in the bottom left of the display. Having spent many years working in Information Technology I'm actually aware of a procedure that can be applied to computers and a vast array of electronic devices to remedy a range of problems. In I.T. we call it 'power cycling.' However it doesn't involve actual bikes or much by way of effort. Power Cycling a device just means turning it off and on again. And more often than not it works. If you've ever watched The IT Crowd Chris O'Dowd's character Roy answers the phone with "Hello, I.T. Have you tried turning it off and on again." If you haven't watched The IT Crowd then I suggest you do. Anyway pulling the batteries out of the base unit and remote sensor and reinstalling them worked for me :). Yay for turning stuff off and on again.

The more eagle eyed readers out there might have spotted that in the picture above the remote thinks it's 19.3 degrees C whilst the base station thinks it's 20.2 degrees. That's a discrepancy of almost a whole degree. Guess Technika aren't going to much trouble to calibrate their devices before shipping. Not a huge surprise really as it's a cheap unit at fifteen beer tokens, there's other units with similar functionality out there going for just shy of four hundred quid.

When two parties can't reach an agreement the obvious thing to do is get a third party's input. So I did. I dug out another digital thermometer I had knocking about and put it with the base station and the remote. I figured it would probably agree with whichever was correct.

There's no agreement here.

It was a good idea but a flawed one. I have no real idea how accurate my digital thermometer is, chances are it's about as roughly calibrated as both the remote and the base station, could even have come from the same factory for all I know. The thermometer read 18.5, the remote 18.8 and the base station 19.1. So I decided to average the readings to hopefully get something more accurate.

(18.5 +18.8+19.1)/3=18.8

Turns out the average of the three readings was actually the same as the reading from the remote, Good enough for me! I don't really need to know  the exact air temperature in my house. After all if it's warm I''m warm, if it's cold I'm not, don't need a digital display to tell me. The remote has to be kept out of drafts, rain and water so I've sat it on a brick under Hive1.

Under Hive1. Needs a sweep actually.
So now thanks to the wonders of wireless technology I can tell if it's cold or not outside without having to venture out into the snow myself.

Monday, 21 January 2013

Bees At The Bottom Of The Garden

It's snowing. The bees are staying in their hives leaving me with very little to blog about so it's time for a little winter filler in the form of another little book review.

My introduction to beekeeping was a 2 day course run by Beverley Beekeepers Association in 2010, they recommended we read Bees At the Bottom Of The Garden by Alan Campion. I'd already started reading Get Starting In Beekeeping though so decided to finish that first. Bees At The Bottom Of The Garden (which I'm now going to call BATBOTG because in these RSI concious times I'm not going to type that lot anymore than I need to) seems to be pitched at a slightly simpler level than Get Started In Beekeeping (GSIB!) and so may be an easier read or it may be that it was less new to me having read the other book first.

The start of many a journey

BATBOTG certainly has more images than GSIB with a large number of illustrations and black and white photographs for those who like to look at pictures, although not all of them do say a thousand words and many are there for aesthetic rather than instructional reasons. The book starts with a little information on bee biology then goes onto explaining the components of a hive, then it takes you through the beekeeping year including extracting the honey, before going into a bit more detail about oil seed rape, managing swarming and bee diseases. It probably does tell you enough to keep your own bees but a bit more reading and internet research would be an idea -that said I don't imagine anyone's likely to read a single book then run out to buy some bees.

Originally published in  1984 and reissued in 1990 the copy I got hold of was revised in 2000, published in 2001 and seems to be the latest version. Just like other books I've read it has a year planner for beekeepers telling you more or less what you should be doing in any given month -which in January is not a lot. Worth a read, definitely a good starting point for anyone wanting bees in their garden and if you want to learn more afterwards you can go to something more in depth like Ted Hooper's Guide to Bees & Honey which seems to be something of a beekeeper's bible at the moment.

Monday, 17 December 2012

Labelled.

I had planned to make my own labels for this years honey crop and after a couple of hours tinkering with GIMP  I came up with a design I was happy with.

Dual monitors, it's the way forwards.
I printed it out and discovered there was a problem with my printer as the bright yellow in the image was a dull green and the black came out green tinted too. Also my labels were just a few millimetres too big to go comfortably on my jars. I could probably sort out the printer -probably a blocked nozzle or duff ink cartridge, it doesn't see much use after all. But I'd still have to source some new labels the right size for my jars, find a template and redesign the labels to fit the new format so I decided to to just buy some instead.

Thornes do a huge range of customised labels and to be honest they're not that expensive, especially compared to about £30 quid for a new set of ink cartridges for my HP Photosmart 3310. With a little help from my housemate I finally settled on a fairly tasteful image of a slightly blurred garden picture in greens and browns with a white WBC hive on one side. The labels are customised to show whatever text you want which is important as there's laws about honey labelling requirements.

If you're selling honey the label has to have the word Honey on it, a contact address for the manufacturer, the weight in metric, the country of origin and a Best Before date. Honey can actually go for years without spoiling -when I say years we're talking about honey being found in ancient Egyptian tombs and still being edible, granulated to hell no doubt but edible nonetheless ..but our society likes it's best by dates it's not like salt expires either but there you go. Oddly the country of origin has to be seperate from the contact address. Anyway I opted for the label to say Raw Garden Honey and used some spare room to point out it's unprocessed and unfiltered.

Ready made labels
When the labels arrived they actually look a lot better than the output of my photosmart printer with a plasticy surface that I suspect mean the ink isn't going to run if it gets wet in a kitchen, and probably means the labels are relatively easy to remove later. Whilst I was ordering labels I decided to get a pack of granulation labels too. They're not totally necessary but, as I mentioned earlier, honey has a hellishly long shelf life and with time it granulates. The granulation label just goes on the back of the jar and tells people why it happens and what to do about it.

Granulation label
Having removed one jar for personal use I still had 41 jars to label. It's safe to say labelling jars isn't the most exciting part of beekeeping so I'll spare you a blow by blow account of that and you can thank me later.

41 jars and 82 labels later
One was jar actually a short measure so I gave it to a mate -can you imagine a better xmas present than a 3/4 full jar of honey? Exactly. Me neither. So now I've got 40 jars of 370g Raw Garden honey to shift. Doing the math it seems that the general consensus that beekeepers break even by their second honey crop and make profit by the third is about right. Bit of a shame I gave away all the first year's crop really but still pretty good considering it's been a bad year for bees with record low honey crops. I've already had some interest from people wanting to buy jars so I'm hoping it should go fairly quickly.

Saturday, 15 December 2012

December Cleansing

Very little to report on the beekeeping front, as you'd expect at this time of year so this going to be a mercifully short entry. Over in Hull we've had freezing nights, freezing days and frozen ponds. Today it was still a little on the cool side at not much over 6 degrees but the bees were flying. Cleansing flights and disposing of the dead was the order of the day.

Crap photo.
In the above pic the bees on the ground are dead ones that've been ejected from the hive and the yellow stuff on the green painted wood is ..well it's actually bee poo. Bees hold it in till it's warm enough to go out and do their business outside -well bearing in mind the hive is their bedroom/kitchen/day room it's not too surprising.

Looking a little further afield than the back garden it's been recently discovered that honey bees have a bite and use it to inject an anaesthetic to paralyse their victims. Whilst it won't disable a large foe like say the agrochemical industry it's enough to paralyse a waxmoth larvae for about nine minutes giving the bees time to haul it out of the hive. The paralysing chemical is 2-heptanone and Vita who I gather sponsored the research are looking to develop it as a local anaesthetic.

In other news my name was in this month's the BBKA News, well my name and a thousand other people who also passed the BBKA Basic Assessment. I was the only one from Hull though.

Monday, 3 December 2012

Honey Warming Cabinet

After extracting honey it needs to be 'ripened'. This means kept at a little under 40 degrees Celcius so any bits of bee or hive relate detrius and air bubbles trapped in it can rise to the top, it also makes the honey easier to decant into jars. So far I've done this by leaving my buckets of honey for a week or so in the airing cupboard. It kind of works but doesn't really give you that much control of temperature and I doubt comes close to the temperature I'd prefer. What's needed is a Warming Cabinet. Like the name suggests it's just a cabinet that keeps the contents warm. They're readily available and if you have £180 burning a hole in your pocket you can have one delivered, or for a lot more have one custom made. However they're actually relatively easy to make, you just need an insulated box, a heat source and some kind of temperature control. Most homes in the UK have an insulated cabinet or two in the form of a fridge or freezer.

One recent November Sunday whilst heading to Pave for a latte with my new housemate, Beth, I spotted a small fridge lying face down on the pavement. After dark we popped back out with my trusty Black & Decker Tough Truck in tow -well actually I was carrying it rather than towing it because those tiny wheels make quite a racket on pavement. We located the prone unit, hoiked it onto the trolley and rolled it home accompanied by gentle roar of stupidly small wheels.

Fridgemaster MRTZ98/1. Grotty version.

Turned out it wasn't a fridge at all but a freezer. A confusingly named Fridgemaster MTRZ98/1 freezer to be precise. Does it matter? Yes. Why? The shelves in this unit are made up of metal tubing that forms part of the cooling system. Freezers and fridges use some pretty nasty gases in their cooling systems. Whilst Freon is no longer used it's quite likely this freezer used HFC-23 or Isobutane as a coolant. HFC-23 is a major greenhouse gas and I'm fairly certain that if someome released a freezerful of the stuff into the environment and then wrote about it in a blog complete with photographs they'ed be looking at a hefty fine, assuming the powers that be are doing their job for a change. Isobutane on the other hand isn't as bad for the environment but it is very explosive, and when it's not being used as a coolant makes a good propellant too.

Tubey shelves. Could be a problem.
Looks a bit grotty inside too.

Whilst pondering how I was going to remove the shelves without releasing the coolant I had a look at the rear of the freezer and discovered I didn't really need to worry about it at all because some idiot had already cut the compressor from the back of the unit releasing whatever coolant was in there out into the street. So whilst scrap metal tatters bring us a few litres of greenhouse gas closer to climate change apocalypse or random explosions there was one less thing for me to worry about. Shame the planet's in such a mess but whilst people prioritise pocketing a little profit over maintaining the fragile ecosystem that keeps them alive we're doomed.

Crime scene :-o


Having ascertained there was no coolant to worry about I started chopping out the shelves. I'd lent a mate my hand axe so wound up using the blunt edge of a machete to buckle the shelves so I could drag them out and hacksaw the two tubes off where they entered the back of the unit. The step at the bottom of the freezer where the compressor and other absent gubbins had been housed meant I couldn't just stand my honey buckets on there. One way round that was to turn the freezer upside down which would've been fine but it looked a bit tatty, well okay more tatty that a disused freezer hauled in off the street normally looks I mean, or to lay the unit on it's back so the back wall became the floor and the door a lid. Less vertical space would've probably made it easier to acheive a uniform heat within the unit too, but there wasn't room in my outbuilding to store it like that -too much bulky beekeeping stuff taking up space. I opted to cut free the bottom shelf and put that back in place to stand the buckets on. The heat source will go in the space below that.

Rocket science this is not.
Having got a fairly well insulated box to use I next needed a heating element. There's plenty of cheap and readily availabe heatsources around in the form of lightbulbs. Energy saving bulbs are currently ousting the old energy inefficient ones that make good heatsources but I'm fairly sure it'll be a while before I can't find any. I was planning to use a 40W bulb but the closest I could find in my local Sainsburys 24hour shoppe was a 42W bulb giving the equivalent of 50W light. I figured that should still work.

If I was to attach a bulb to a power suplpy, turn it on and leave it in a closed plastic freezer I don't really know how hot it would get and I don't want to start a fire or damage the honey so I needed to add some kind of heat controller. There's a few options people use for these including aquarium and immersion heater thermostats, I opted for a room thermostat as unlike the other two it's intended to read air temperature rather than liquid temperature. A lot of room thermostats only go up to 30 degrees which is a little low for what I need but a little searching on fleaBay I was able to find a Towerstat branded one that appears to go up to 40 degrees. I attached a baynet bulb socket I had sat in a toolbox for years and the flex from my tragically deceased coffee machine. I then had a rethink and decided to add a second lightbulb to speed things up a bit. The lights will be turned on till the thermostat reaches the desired temperature at which point they'll be turned off again till it drops and the thermostat reactivates them.

Heat sources and temperature controller

With a pair of light bulbs sat there kicking out heat there would be a pretty uneven heat distribution within the cabinet (I've stopped calling it a freezer now) so there needs to be some sort of airflow within the cabinet to mix it up a little. I added a couple of old 80mm computer fans attached to the 12V transformer from an old Netgear Wireless N access point.


They're not my biggest fans

The plan was pretty simple, drill a hole throught the freezer side, push a cable through and attach a two way adapter inside the cabinet and put a plug on the outside end. Plug the bulbs and fans into the two way. I didn't have a two way socket adapter knocking about so used a three way instead. I used some No-More-Nails type glue to attach the thermostat to the freezer wall as well as the three way and used a few nails to fix the bulbs to a wooden block from a pallett I'd liberated from a skipsome time ago. The fans were cable tied to the shelf with the left one moving air up and the right one moving air down.

All the gubbins in place.
Whilst I'm no physicist the fan placement and orientation should keep the air moving in a more or less clockwise flow and stop hot spots developing near the bulbs. After a little reshuffling of the outbuilding contents I was able to find a place for the cabinet to live, then I cut the cable from the back to the right length to reach the socket and attached a plug. The warming cabinet was complete and just needed testing. I turned it on set a temperature, watched the lights go on and heard the fans whirr. The important bits seeemd to be working, I just needed to check it'd reach and maintain a target temperature. Setting it to the thermostat's highest temperature I took an Indoor/Outdoor Thermometer, popped the probe into the freezer, closed the door and sat the digital bit on the top. I then went inside and made a Latté with my replacement coffee machine, a Cookworks Espresso Coffee Machine, this is probably the slowest coffee machine in the world. You could make brew and drink a cup of tea in the time it takes this machine to make a frothy coffee, hell you could probably go to India and pick the leaves yourself if you fancied travelling. After my coffee break I went out and checked the thermometer. It was 39.5 degrees Celcius in the cabinet and about 7.5 degrees outside. Success. I turned it off unplugged it and propped the door open in case the glue I've used outgasses as it cures.

It'll work even better with that door closed
One more bulky item added to my beekeeping inventory. As I already had most of the parts lying about or picked them up for free in my travels the whole thing cost me well under a tenner. Probably won't need it till September 2013 at the earliest.

Friday, 23 November 2012

Cyser or "How d'ya like them apples?"

In December 2011 I was given a tub of windfall apples in exchange for a tin of beeswax polish and decided to try making Cyser, apple mead. I looked at Cyser recipes on the internet and the one in Andy Hamilton's Booze For Free before piecing my own together. It seems there's as many different ways to make cyser as there are worms in apples.

Windfall apples from Newbald
Initial Ingredient List
4.5KG Apples
150g Sugar
10 Sultanas
2 Cloves
1360g Honey
Another 680g Honey to add later
1.5 Litres Water
1 Teaspoon Pectolase
1 Teaspoon Yeast Nutrient
1 Sachet of Wine Yeast

First thing I did was put the apples through a juicer. It took a while to chop up and juice the apples and twice I had to stop and clean the machine out as the pulp clogged it up and and it started to whine.

Juicing apples exactly how subsistence farmers in days of yore did.

Eventually when they'ed all been converted to liquid I added 2 cloves and 10 sultanas and boiled the lot for 10 minutes -mainly to kill anything living in the apples, some of them had been quite lively having spent a while on the ground. It tasted a little tart so I added 150g of sugar to the mix.

I decided against boiling the honey (some people do, some people don't, some people says it damages the honey, some people say it doesn't) and heated up half a litre of Tesco's spring water whilst the four 340g jars of Tesco's cheapest Clear Honey loitered in a bath of hot water. Once the honey was good and runny I poured it into the water using topping up the jars with more water to rinse out the last dregs and adding that to the pan too. Gave it a stir till the honey looked to have dissolved.

Next up I poured the honey and water mixture into the demijohn and added an orange I'd chopped up and mashed. I didn't want to wait all day for the apple and sugar solution to cool so I ladled that in and after adding the pectolase and yeast nutrient I sat the whole thing in a sink half full of cold water to cool. An hour later it'd cooled and there was about an inch of air space at the top. This bit of air is called headspace by brewers, and my lack of it turned out to be a problem later. I gave it a quick stir with a sterilised chopstick, added the yeast, waited 15 minutes then gave it another stir like the sachet said to before putting the airlock on.

Freshly racked and looking a little opaque
24 hours later fermentation was happily underway but unlike the meads and cranberry melomel with this fermentation a load of froth was produced and the pulp had risen to the top of the demijohn pushing liquid and froth out through the airlock so after a quick clean up and rinsing out of the airlock I decanted some of the liquid into a a milk bottle with a foodbag rubberbanded to the top and sat it and the demijohn in a plastic tub in case it happened again. Looking at a couple of brewing website the froth is apparently called kraeusen, I was happy to call it froth but there ya go. Anyway it should only present a problem for the first few days but, as I read, if the pulped fruit blocks the airlock the pressure from the buildup of CO2 can crack the demijohn.

Cranberry Melomel on left and Cyser on the right.
Four days later the majority of the pulp had sunk into the  liquid so I was able to pour the contents of the milk bottle back into the demijohn. I had a little taste of the dregs in the milk bottle and  and can honestly say it was pretty sweet, however that gave no real indicator of the final flavour as the stuff was still full of sugar the yeast had to consume.

Whilst the fermentation is going on bubbles can be seen in the water in the airlock. A fortnight after starting the fermentation the bubble had slowed quite a lot so I decided to rerack it, removing the liquid from the bits of apple and the lees (dead yeast). You're meant to do this with a siphon but having had a try and finding the siphon kept dropping lower into the demijohn than I wanted (need to get or make some kinda clip to hold it in place) I wound up pouring it through a couple of coffee filters sat in a sieve in a funnel in the demijohn. Not the best way to do it as ideally there should be minimal aeration..but it worked.

After an hour of painstakingly slow filtering it began to flow through the filter faster and I realised one of the coffee filters had a hole in it. D'oh! I figured the heavier stuff will still have been near the bottom of the bottle and not gone through the hole in the filter. So I whipped out the filters and in replaced them with a sheet of kitchen roll, one of those thick one's that claims to act more like muslin than paper -a claim it seemed to live up to. The liquid came through this much faster than the coffee filters and I was able to finish that in a matter of minutes. I was left with a kitchen roll full of yucky looking thick yellow apple pulp and a demijohn of uniformly pale orange liquid.

I left this alone for a couple of months before re-racking again then gave it another two months and sampled the cyser again. Things had really changed in there. This time it was really dry. The yeast had had a great time turning sugars to alcohol leaving it a little dry for my palate so I figured I'd need to backsweeten it later. There seems to be two different ways to back-sweeten. One involves waiting till the fermentation has stopped then adding syrup or honey as required, the other is to just add the syrup or honey and hope the yeast will die off due to the rising alcohol content before consuming all you've added. I went for the second way, as it sounds easier' after all I could back-sweeten it again later if need be. I added the last two jars of honey filling the space left from previously being reracked and put the bung and airlock back on.. Looking at the air lock I could see fermentation was still going on as bubbles slowly made their way through. Eventually the bubbling stopped and I sampled it again, too dry! This makes me wonder if Tesco's cheapest honey is maybe cut with some kind of sugar syrup which the yeast was better ale to break down than the sugars found in real honey. Anyway I was going to have to backsweeten it again, on the plus side the alcohol content was up.

Harris Quickfine filter. It's not quick.
But it does filter rather well.

At this point I'd acquired a Harris Quickfine Filter from an auction. It's a filter system that's unfortunately no longer made but going by the wine making forums is one of the best filters around but also the slowest. You make up a small bucket of whatever you're brewing add 3 chemicals then pour this into a cloth filter which you top up as it runs through till you've filtered everything. It's painstakingly slow. We're talking leave it overnight kind of slow. Came out good and clear though. :) Potent stuff too going by the sample I tried, I really to need to get one of those gadgets for measuring alcohol content.

If your wee looks like this, drink more water

As I mentioned I'd decided to backsweeten it again, but I didn't really have space in the demijohn for it so I split the cyser between two containers and added some 1:2 sugar:water syrup -yep same stuff I feed the bees in spring. Popped airlocks on both vessels in case fermentation restarted then left it a while. The glass demijohn contains a sweeter cyser than the plastic one -more sugar syrup in that one.

Cyser backsweetened an split across containers
A month or so later I filtered it a last painstakingly slow time and decided to bottle it. Having acquired an automatic bottle filler I decided to use that. After a few trial runs with sterilising solution and then water to get it clean and figure out how it worked I soon had the cyser bottled and ready for corking.

Racking to bottles. Woohoo!

I started the project in December 2011 and bottled it in July 2012. In November 2012 I opened the first bottle. I may have been a little heavy handed with the final backsweetening giving me more of a desert drink but certainly enjoyable.

Also in December 2011 I started making a Cranberry Melomel. This ran more or less parallel with the Cyser fermentation, you can see the dark red demijohn full of Melomel in the fourth photo down in this post. Like the Cyser I reracked this a few times slowly running it through the Harris Quickfine. Here's a picture of it somewhere along the line, looks a little nicer than the the demijohn of gore it started out as.

Cranberry Melomel
The end product is a very pale pinkish liquid and tastes fantastic. Whilst I'll be tweaking my Cyser and Mead recipes in future this one is spot on. The flavour is meant to change over time and I still have most of the mead, cyser and melomel ageing in bottles at the moment. The mead and cyser look identical but following the fizzy mead cork popping fiasco I'd moved the mead back into demijohns and eventually reracked the remainder into green bottles, otherwise I'd now have no idea which was which.

Cranberry Melomel and Cyser.